PoorSDR4All for uSDX: a much more complete SDR experience from your PC
Developed in the Acuántico Power lab · PoorSDR4All 1.0.0a4 · Alpha
If you have a uSDX v1, v2, or one of the many minimalist clones, you probably know this scene well:
MENU. EXIT/MODE. Encoder.
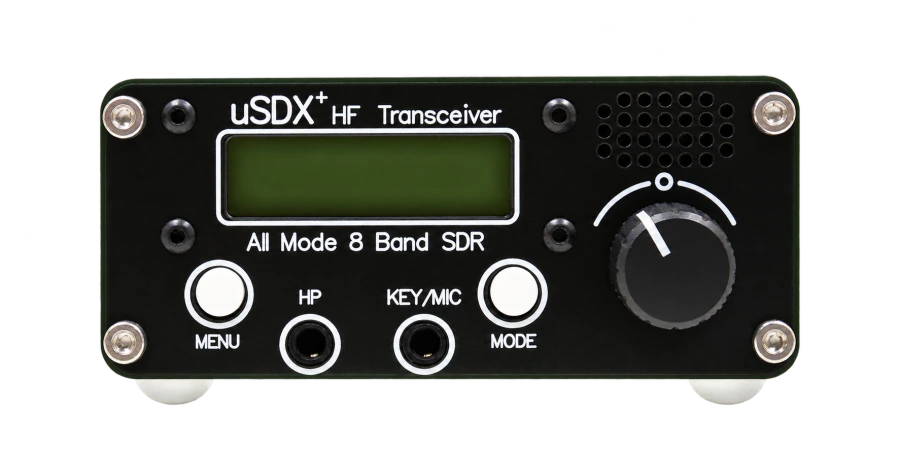
You want to go from 40 m to 20 m. You switch bands and then have to check the mode, because on 40 m you were on LSB and on 20 m you’ll normally want USB. Then a signal shows up that you want to fine-tune: you drop the tuning step from 1 kHz to 0.5 kHz. You finish and want to go back to 1 kHz. It can all be done; what wears you down is having to dig through menus for actions you repeat constantly during a normal operating session.
That’s where PoorSDR4All comes in
PoorSDR4All is Acuántico Power’s own tool, built so your computer becomes an operating console around the uSDX and brings its use closer to the experience of a much more complete SDR transceiver. The radio is still the same one. The RF stage and the power output are still the same. What changes is the way you handle it.
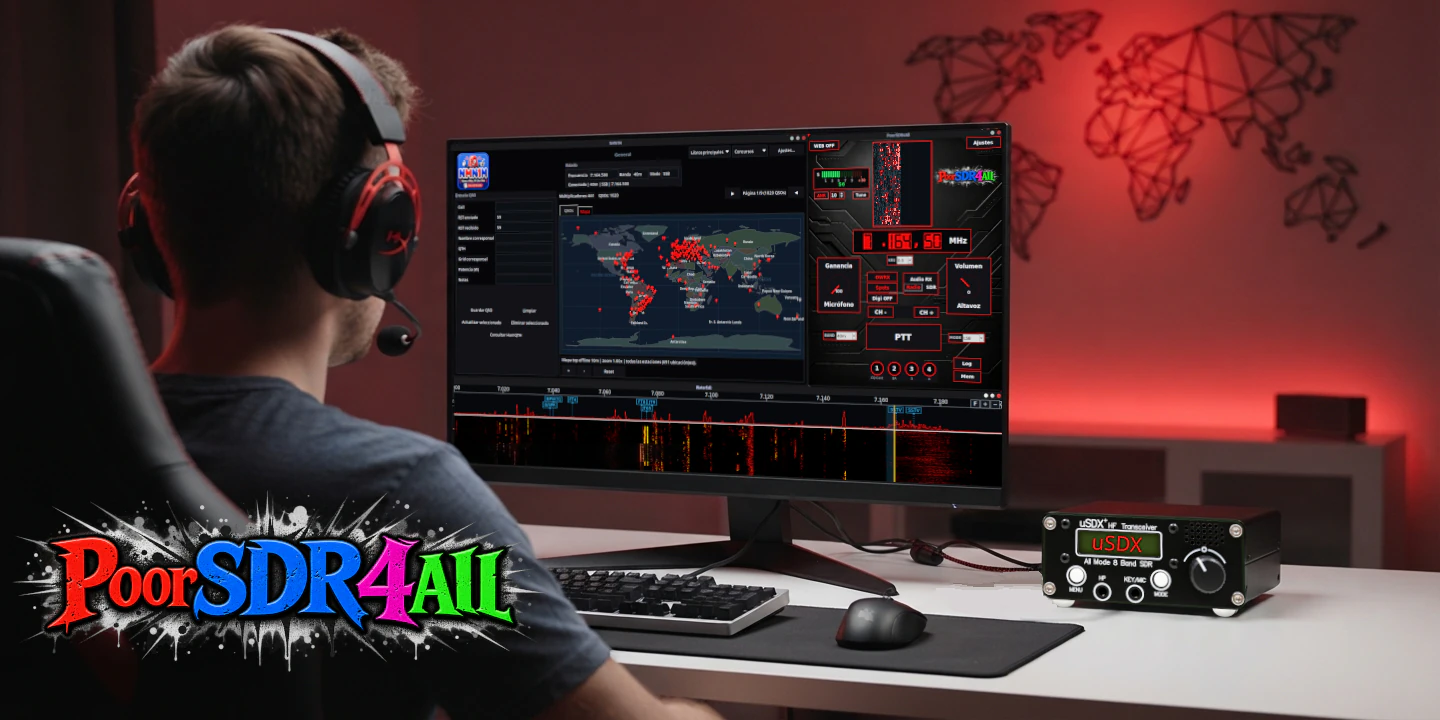
From a single interface you can have in front of you frequency, band, mode, tuning step, PTT, Tune, volume, mic gain, ANR, Radio/SDR audio, OpenWebRX+, waterfall, spectrum, S-meter, spots, Digi, memories, autocall macros, and quick shortcuts. Underneath, PoorSDR4All coordinates CAT, audio, network services, and external integrations.
PoorSDR4All can be used partially without OpenWebRX+ for functions like CAT, radio audio, memories, or autocall macros. However, OpenWebRX+ is a fundamental part of the project and is required to enjoy the full experience: without it you lose integrated SDR reception, the waterfall, the spectrum display, the derived S-meter, and other functions tied to that backend.
The idea is simple: a small, minimalist uSDX shouldn’t have to feel small just because you’re operating it from the PC.
PoorSDR4All doesn’t try to turn the uSDX into a different rig or give it RF capabilities it doesn’t have. Its goal is more practical: strip away most of the friction of the physical front panel and use the computer to build a more comfortable, visual, and integrated station around the radio.
It doesn’t change the radio. It changes the experience of using it.
PoorSDR4All
Official graphical installer for Linux. Open Releases, download the latest .run file, and verify it with the SHA-256 file published alongside it.
PoorSDR4All for Windows
Graphical installer for Windows 10/11. It prepares WSL2 with Ubuntu 24.04, installs OpenWebRX+, and sets up USB access for the SDR. Verify it with the SHA-256 file published alongside it.
Quick manual: from zero to operating safely
Recommended path
Set up CAT first, confirm reception, and leave transmitting for last. If the frequency on screen doesn’t match the radio, don’t try PTT yet.
1. Connect the uSDX over CAT
| Item | What to do |
|---|---|
| Goal | Get PoorSDR4All reading and changing the radio’s frequency and mode. |
| You need | The uSDX powered off while making the connections, a free USB port, and a CAT USB-to-serial cable or interface suitable for your specific transceiver. Radios sold under the uSDX name do not necessarily use the same connector, pinout, or electrical levels, and a power-only USB cable cannot carry CAT data. Before connecting anything, confirm that the interface matches your exact model and hardware revision, install the USB-to-serial adapter driver if your operating system requires it, and check the wiring diagram carefully. You can purchase a compatible cable for your particular transceiver or build one yourself using the documentation and schematics widely available online for that exact variant. |
| Settings | Settings → Radio / CAT: pick port, profile, and speed. |
| Check | Change frequency a few steps, then switch USB/LSB. The console and the radio should track each other. |
| If it fails | Check the port, permissions, cable, speed, and whether another program is holding the serial port. |
2. Set up reception
| Item | What to do |
|---|---|
| Goal | Listen without accidentally sending audio to the transmitter. |
| You need | The uSDX’s audio output or an SDR/OpenWebRX+ receiver. |
| Settings | In Settings → Audio, assign speaker, microphone, and the radio endpoints. In the console select Radio or SDR. |
| Check | Tune a known signal, start at low volume, and raise it gradually. |
| If it fails | Check the actual endpoint, the sample rate, the RX source, and whether another application has the device locked. |
3. Tune in a signal
- Choose BAND to jump to a band.
- Choose MODE. For HF phone, LSB is normally used on the lower bands and USB on the higher ones, but the band plan and the actual signal always take priority.
- Select the tuning step.
- Move the VFO with the wheel, keyboard, arrow keys, or channel controls; for an exact frequency, edit the display.
- Confirm the uSDX has followed the change.
4. Open the SDR experience
Before continuing, connect to OpenWebRX+ an SDR receiver capable of covering HF and a suitable antenna. If the SDR shares the uSDX’s antenna, don’t transmit until you’ve installed an automatic antenna switch that isolates it during TX.
- Start or connect to OpenWebRX+.
- Press OWRX.
- Select the SDR reception source if you want to listen to that stream.
- Change band and check that the waterfall follows the matching profile.
- Click a signal on the waterfall to tune it from the console.
5. First transmit test
TX: run your first test with margin
Use a dummy load or a suitable antenna, low power and gain, and follow your country’s regulations. PoorSDR4All doesn’t replace the protections, the band plan, or the operator’s judgment.
- Set up the PC’s microphone and the audio output to the radio.
- Lower Gain / Mic before you start.
- Key PTT briefly and check the TX state.
- Release PTT and confirm the radio goes back to RX.
- If PTT doesn’t switch correctly, stop the test and check the CAT connection, the profile, the speed, and firmware compatibility.
6. Save a frequency
Open Mem, save a name, frequency, and mode, and recall it whenever you want to return to that spot. Memories are local to PoorSDR4All: they tune the radio, but they don’t program the firmware’s internal memory.
What uSDX is and why there are so many variants
uSDX —also written µSDX in some projects— is a family of QRP transceivers largely defined by software. The original idea shrinks the hardware a lot and pushes functions into firmware, so the rig can be small and cheap, but its physical interface tends to be equally minimal.
Over time, follow-ups, derivative boards, and commercial units appeared under names like uSDX, (tr)uSDX, usDX, uSDR, or QCX-uSDX. You shouldn’t assume that two rigs sold as “uSDX” share the same firmware, the same USB converter, the same connectors, the same CAT speed, or the same PTT behavior.
Why this matters in PoorSDR4All
Real compatibility depends on your rig’s firmware and CAT interface. If a radio answers the Kenwood/TS-480 subset used by PoorSDR4All, frequency, mode, and PTT have a compatible baseline; that doesn’t automatically certify audio, filters, connectors, or every quirk of each clone.
Original uSDX and (tr)uSDX
PoorSDR4All includes a generic TS-480 profile at 38400 baud and a trusdx-115200 profile for modern (tr)uSDX firmware. In the current Alpha, the latter is implemented but still marked as pending full physical validation on more rigs.
As a rule of thumb: don’t change values at random just because your radio is called uSDX. Identify the variant, firmware, port, and speed first.
What PoorSDR4All is
PoorSDR4All is a radio operating console written in Python with a Tkinter interface. It brings together in a single desktop application what normally means having half a dozen programs open at once:
- CAT control of the radio (Kenwood protocol / TS-480 emulation, the same one QRP rigs like the µSDX also speak).
- rigctld Proxy and a network TS-480 emulation layer for integrating external software without several applications having to open the same physical serial port directly.
- Embedded SDR waterfall (via OpenWebRX+) that follows the console: you change band and the SDR profile changes on its own; you click the waterfall and the console tunes to that frequency.
- Digi viewer showing the decodes available from the backend. To make FT8 contacts with WSJT-X, it connects to PoorSDR4All’s rigctld proxy and uses its own audio chain.
- Optional remote web server for operating from another device or from your phone.
- Autocall macros with prerecorded audio, and plugins — a logbook with contest features, WiFi filter relays.
It’s an Acuántico Power project, with the source code publicly available on GitHub under a noncommercial license (details below, in License). It isn’t software as a service: it installs on your machine, keeps its configuration on your machine, and doesn’t send anything anywhere you haven’t explicitly configured.
At a glance
| Function | What it does |
|---|---|
| Radio / CAT | Frequency, mode, and PTT control over CAT. |
| rigctld + TS-480 emulation | Lets external software integrate via rigctld or, when it doesn’t support rigctld, via the compatible emulation layer. |
| Waterfall (OWRX) | Embedded SDR waterfall that follows the console’s band and frequency in both directions. |
| S-meter | Fed from the waterfall’s dBFS level. By default it auto-calibrates and lets you place the detected ambient QRM at the chosen S unit; it also supports a fixed scale based on a user-measured S9 reference. |
| Audio | Independent routing of the PC’s and the radio’s speaker/microphone, with optional noise reduction (ANR). |
| Digital modes | Digi viewer showing FT8, FT4, JT65, WSPR, and other decodes provided by the installed backend. Contacts are made with the matching radio program, such as WSJT-X for FT8. |
| Spots / DX Cluster | Spots over MQTT or telnet, with configurable duration on the waterfall. |
| Remote web server | Off by default; requires a password and a signing secret before it will start. |
| Autocall | Up to 10 audio macros (repeats + interval) assignable to the console’s 4 autocall buttons. |
| Keyboard shortcuts | 30 console actions, each assignable to any key you want. |
| Themes | 6 color palettes: Executive, Devil Power, Bannana Cream, Acid Jungle, Mizuno Night, and Fresh Squishee. |
| Bands | 160 m to 10 m, including 11 m (CB) and 60 m. |
| Plugins | Filter Relays ships as an optional plugin. Nunca Más, Ni Una Más (NMN1M), which provides the logbook, is an independent project installed separately. |
| Languages | Interface strings prepared in 12 languages (see the status note in Interface). |
What PoorSDR4All does and doesn’t do
PoorSDR4All tries to bring uSDX operation together in one place, but useful documentation also has to make clear where the program ends and the radio, the auxiliary SDR, and external services begin.
| Area | Does | Should not be read as |
|---|---|---|
| CAT | Reads/sets frequency and mode, queries status/ID, and switches TX/RX within the implemented subset. | Full control of every internal menu or parameter on every uSDX clone. |
| SDR / waterfall | Coordinates OpenWebRX+, band profiles, waterfall, spectrum, and tuning. | A waterfall generated by the uSDX’s basic CAT. |
| S-meter | Derives the reading from the SDR stream’s dBFS: relative, with the noise-floor S level configurable in auto-calibrated mode, or referenced to S9 when the user runs a fixed calibration. | An absolute, uncalibrated RF measurement, or a CAT reading provided by the transceiver. |
| Digi | Shows decodes available in the OpenWebRX+/WSJT-X environment. | A self-contained, universal decoder bundled inside the executable. |
| Memories | Saves and recalls local memories. | Programming the uSDX’s EEPROM or internal memories. |
| Security | Includes controls for the web server and ships closed by default. | A service you should expose directly to the Internet without designing the network around it. |
This Alpha also doesn’t document, as uSDX-specific CAT control: RIT, IF filters, RF gain, the radio’s internal volume, AGC, SWR, RF power, or general telemetry.
Compatibility with uSDX, (tr)uSDX, and operating systems
| Profile | Intended use | Baud | PTT | Status |
|---|---|---|---|---|
custom | Manual setup | Configurable | CAT | Default |
generic-ts480 | uSDX/(tr)uSDX with the common TS-480 dialect | 38400 | CAT | The project’s reference profile |
trusdx-115200 | (tr)uSDX with modern firmware | 115200 | CAT | Implemented; broad physical validation still pending |
| Platform | Alpha status | Scope |
|---|---|---|
| Arch Linux x86-64 | Functional validation by the maintainer | Main platform |
| Debian/Ubuntu x86-64 and arm64 | Automated build and tests | Pending validation on more real hardware |
| Raspberry Pi OS 64-bit | Planned install on arm64 | Pending broad physical validation |
| Windows 10/11 x86-64 | Experimental | Python CAT/audio; remote OpenWebRX+ or WSL2 |
| macOS | Not announced as a supported platform | Do not present as validated in this Alpha |
CI isn’t a connected radio
The package installing, passing tests, or building in CI is not the same as checking CAT, audio, SDR, or PTT with real hardware. The Alpha specifically needs reports from users with different radios, interfaces, and systems.
Requirements
For CAT and the console only
- Python 3.11 or later.
- Tkinter, PortAudio, and PySerial, along with the project’s Python dependencies.
- A uSDX or a variant with compatible CAT.
- A USB-serial data cable/interface recognized by the system.
For physical audio
- A PC audio input to receive from the radio.
- A PC audio output to the transceiver.
- Wiring suited to your variant’s levels and connectors.
For the full SDR experience
- OpenWebRX+, local or remote.
- An SDR dongle or receiver compatible with OpenWebRX+ and capable of receiving the HF bands you want to use. This is required whether OpenWebRX+ runs locally or on another machine.
- A suitable receive antenna connected to the SDR.
- If the SDR and the transceiver share an antenna, an automatic RX/TX antenna switch that disconnects and isolates the SDR before you transmit.
- External decoders installed for whichever digital modes you want to use.
- SpeexDSP 1.2.1 if you want ANR.
- A C compiler only if you want to build the optional native accelerator.
Protect the SDR receiver during transmission
The ideal setup has the uSDX and the SDR receiving from the same antenna, but they must not be connected to it directly at the same time when you’re going to transmit. RF energy from the transmitter can damage the SDR’s input. You must use an automatic antenna switch suited to your operating frequency and power, with enough isolation and coordinated switching to disconnect the SDR before TX is enabled. A common passive splitter is not a substitute for that protection.
Current status of the Alpha release
The current release is 1.0.0a4 — Alpha. It works in the author’s main development environment, but it still needs community validation with more radios, audio interfaces, and operating systems. The table says exactly how far each platform gets today — no more, no less:
| Platform | Alpha status | Scope |
|---|---|---|
| Arch Linux x86-64 | Functional validation by the maintainer | Main platform |
| Debian/Ubuntu x86-64 and arm64 (incl. Raspberry Pi OS 64-bit) | Automated build and tests | Pending validation with real hardware |
| Windows 10/11 x86-64 | Graphical .exe installer (WSL2 + OpenWebRX+); tested in a Windows 11 virtual machine | Alpha; pending tests with a real SDR and on users’ computers |
CI results confirm that the code installs, tests, and builds — they are not a physical test of radio, CAT, SDR, or audio. If something fails on your hardware, a report on the GitHub issue tracker is exactly the kind of help this project needs right now.
PoorSDR4All
Complete source code and documentation for manual installation, review, and contributions.
How to install PoorSDR4All
PoorSDR4All is distributed as source code and also with graphical installers: a self-extracting .run for Linux and an .exe for Windows 10/11. OpenWebRX+ and its stack (csdr, pycsdr, owrx_connector…) are not bundled as precompiled binaries: the installer downloads them from their official repositories at pinned revisions, compiles them on the user’s machine, and preserves their GPL/AGPL licenses.
Recommended graphical installation on Linux
The easiest way to install PoorSDR4All on Linux is the official graphical installer: a single executable file that handles system dependencies, OpenWebRX+, the frequency display’s LED font, and the application-menu shortcut without requiring the terminal.
✔ Compatible with Arch Linux, Debian, Ubuntu, and 64-bit Raspberry Pi OS.
✔ Automatic installation with live progress; no terminal is required.
✔ Every release provides a matching .sha256 file to verify the download’s integrity.
Recommended graphical installation on Windows 10/11
I have tried to make installing on Windows as easy as possible, with users who have minimal computer knowledge in mind. The installer installs PoorSDR4All, prepares WSL with an Ubuntu 24.04 image, installs OpenWebRX+ in it, handles the permissions, and sets up everything WSL needs to detect the SDR’s USB device. If you find any bug, please report it in Issues.
More details (what it does, requirements, and warnings) in the Windows section below.
What exactly does it install?
The wizard lets you select OpenWebRX+ and the SDR waterfall —recommended—, the spots/DX Cluster service, and the remote web-server extras for browser operation. All three options are selected by default. When it finishes, it creates an application-menu shortcut using the PoorSDR4All logo.
Requirements: an X11 or Wayland graphical session and an Internet connection during installation. PoorSDR4All’s own code is included in the .run file, but the wizard still needs to download system packages and compile OpenWebRX+ from its official sources.
Would you rather install manually or inspect the script first? Continue with the manual installation. The graphical installer is a wizard that runs the same scripts/install.sh with the selected options.
Manual installation on Linux (with OpenWebRX+)
The manual installation uses scripts/install.sh. The script detects Arch or Debian, installs system dependencies, compiles the accelerator, clones the OpenWebRX+ stack at exact pinned revisions, applies the patches published in patches/, and configures its systemd services. It requires sudo and modifies packages, groups, udev, polkit, and systemd; review it before running it, as with any installer that modifies the system.
Manual installation for Arch, Debian, Ubuntu, or Raspberry Pi OS:
git clone https://github.com/Acuantico/poorsdr4all.git
cd poorsdr4all
scripts/install.sh
Advanced installer options
Environment variables that change its behavior:
| Variable | Effect |
|---|---|
SKIP_OWRX_BUILD=1 | Doesn’t build/install OpenWebRX+ (console only). |
SKIP_SPIDER=1 | Doesn’t install owrx-spider (DX cluster). |
INSTALL_WEB_EXTRAS=1 | Also installs the remote web server’s dependencies. |
OWRX_BUILD_JOBS=4 | Build parallelism (match it to your core count). |
RESET_OWRX_CONFIG=1 | Before installing, makes a dated copy of the current config at /var/lib/openwebrx/backup-poorsdr-* and then applies the clean template. |
A normal update (without RESET_OWRX_CONFIG) keeps settings.json, users, and OpenWebRX bookmarks exactly as they were.
Arch Linux
The following procedures install the console manually. They’re useful for development or custom installs; to also get the local OpenWebRX+ stack, use the recommended installer above.
sudo pacman -S --needed python tk portaudio git base-devel
git clone https://github.com/Acuantico/poorsdr4all.git
cd poorsdr4all
python -m venv .venv
. .venv/bin/activate
python -m pip install --upgrade pip
python -m pip install .
python scripts/build_native.py       # optional accelerator
python -m poorsdr
Debian / Ubuntu / Raspberry Pi OS (64-bit)
sudo apt update
sudo apt install python3 python3-venv python3-tk portaudio19-dev git build-essential
git clone https://github.com/Acuantico/poorsdr4all.git
cd poorsdr4all
python3 -m venv .venv
. .venv/bin/activate
python -m pip install --upgrade pip
python -m pip install .
python scripts/build_native.py       # optional accelerator
python -m poorsdr
Windows 10/11
Recommended graphical installation. I have tried to make installing on Windows as easy as possible, with users who have minimal computer knowledge in mind. The installer installs PoorSDR4All, prepares WSL with an Ubuntu 24.04 image, installs OpenWebRX+ in it, handles the permissions, and sets up everything WSL needs to detect the SDR’s USB device. If you find any bug, please report it in GitHub.
Download poorsdr4all-installer-1.0.0a4-windows-x64.exe from the 1.0.0a4 release, check its .sha256 file, and run it. Here is what it does:
- Installs PoorSDR4All with its shortcuts.
- Prepares WSL2 and creates in it its own private Ubuntu 24.04, without touching any other distributions you may have.
- Installs OpenWebRX+ and the spots service inside it. They start when you open PoorSDR4All and stop when you close it, just like on Linux.
- Authorizes the usual USB SDRs (RTL-SDR, Airspy, HackRF, SDRplay…) and connects them to WSL when the app opens; it releases them when it closes, and tells you clearly if it finds none.
- Offers the RTTY Power plugin and the logbook (NMN1M), both ticked by default; the logbook can also be opened as a standalone program with its own shortcut.
It needs 64-bit Windows 10 (2004 or later) or Windows 11 and an Internet connection: the first time it downloads Ubuntu (about 370 MB) and compiles OpenWebRX+, which takes 20 to 40 minutes. While an SDR is connected to WSL, Windows cannot use it; when you close PoorSDR4All it goes back to Windows. The .exe is not signed, so Windows SmartScreen may show a warning the first time. It has been tested in a Windows 11 virtual machine, not yet with a real SDR.
Manual installation on Windows (alternative)
Install Python 3.11 or later and Git. For the optional accelerator you’ll need Visual Studio Build Tools with the C++ workload, clang, or MinGW. Audio uses WASAPI via PyAudioWPatch, and CAT talks over COM ports. OpenWebRX+ doesn’t install natively on Windows: point to a remote OpenWebRX+ server or run it inside WSL2.
git clone https://github.com/Acuantico/poorsdr4all.git
Set-Location poorsdr4all
py -3.11 -m venv .venv
.venv\Scripts\Activate.ps1
python -m pip install --upgrade pip
python -m pip install .
python scripts\build_native.py       # optional; requires MSVC, clang, or gcc
python -m poorsdr
Plugins
Plugins are independent, optional Python packages installed separately:
python -m pip install ./plugins/filter-relaysNunca Más, Ni Una Más (NMN1M), the logbook that provides the “Log” button, isn’t part of the PoorSDR4All tree: it’s an independent project, with its own repository, license, and release cycle. It must be installed separately following its own instructions. With no extensions installed, the console works the same, but it doesn’t show the “Log” button or the “Relays” tab in Settings. More detail in the Plugins section.
Optional functions that depend on external software
- Remote web server:
python -m pip install ".[web]". - FT8 / FT4 / JT65 / WSPR: you need the official WSJT-X decoders installed.
- ANR (noise reduction): needs SpeexDSP 1.2.1 installed on the system.
- GTK viewers (waterfall and Digi panel as separate GTK processes): optional; if they’re not available, the waterfall falls back to its Tkinter version.
First launch and where everything lives
PoorSDR4All never stores configuration, logs, or databases inside the installed package — everything goes to the standard user directories:
| Linux | Windows | |
|---|---|---|
| Configuration | ~/.config/poorsdr/config.json | %APPDATA% |
| Data | ~/.local/share/poorsdr/ | %LOCALAPPDATA% |
| Cache | ~/.cache/poorsdr/ | — |
PoorSDR4All runs with python -m poorsdr or the installed poorsdr command. Configuration, data, and logs are saved in the user’s directories, separate from the installed package.
The most common serial ports on Linux are /dev/ttyUSB0 and /dev/ttyACM0; on Windows they’re COM1, COM2, etc. The Settings window enumerates them automatically when it opens (along with audio devices), but the combo boxes stay editable by hand in case detection fails or the device is unplugged at that moment.
First connection: how to connect a uSDX to your PC
Take this first setup step by step. The goal is to validate each layer separately: first CAT, then reception, then SDR if you’re going to use it, and only at the end, transmission.
- Connect the CAT cable with the radio powered off. If you’ll use physical audio, also connect the audio input and output.
- Turn on the uSDX and open PoorSDR4All. You can run
poorsdrorpython -m poorsdr. - Open Settings → Radio / CAT. Select the real port. On Linux it’s normally
/dev/ttyUSB*or/dev/ttyACM*; on Windows, aCOMport. - Select the profile and speed. Use your firmware’s own values; don’t copy the ones from a screenshot of a different install.
- Save and check frequency/mode. If the dial doesn’t follow the console, stop here and fix CAT first.
- Set up Settings → Audio. Assign all four audio roles and start at low levels.
- Choose Radio or SDR. Radio listens to the physical input; SDR uses the OpenWebRX+ stream.
- Check reception. Tune a known signal and confirm frequency, mode, and audio.
- Set up OWRX if you want waterfall/spectrum/Digi.
- Test TX last. Low gain, a suitable load/antenna, and a brief key-down.
Don’t copy the values from the screenshots
Ports like /dev/ttyUSB0, audio device names, IPs, frequencies, or paths belong to one specific install. The screenshot is there to help you locate the field; the correct value is whatever your own machine has.
The main console: control by control
This is the part that really changes the uSDX experience. The main screen brings together the controls you use most during a radio session, so the rig’s physical menu stops being the center of operation.
| Control | What it does | When you’ll use it |
|---|---|---|
| WEB OFF / WEB ON | Turns the optional web server on or off. | When you want control from another browser/device. |
| EDIT | Turns on advanced layout-editing mode. | Doesn’t show up in a normal install. It’s a development tool that only appears when PoorSDR4All is started with the POORSDR_DEV_LAYOUT=1 environment variable. |
| Settings | Opens all the configuration tabs. | CAT, audio, OWRX, web, interface, autocall, shortcuts, and plugins. |
| S-meter | Indicator derived from the SDR/dBFS stream, with auto-calibration or an optional fixed scale. | Comparing signals or taking referenced readings once it’s calibrated. |
| ANR | Turns noise reduction on/off. | Improving intelligibility when the filter helps. |
| Tune | Generates a test tone and drives the TX chain. | Brief adjustments and checks, with the antenna setup ready. |
| Mini waterfall | Compact view of activity around the frequency. | Quickly seeing where there’s energy without opening the full viewer. |
| Frequency | VFO display/editor. | Exact tuning from the keyboard, wheel, or arrow keys. |
| Step | Sets how much the VFO moves per action. | Going from a quick sweep to fine tuning without digging into menus. |
| Gain / Mic | TX chain level. | Adjusting transmitted audio without overdriving it. |
| Volume / Speaker | RX listening level. | Adjusting reception. |
| OWRX | Opens/closes the SDR experience tied to OpenWebRX+. | Waterfall, spectrum, S-meter, and band tracking. |
| Spots | Opens spot filters/options. | Seeing DX activity on the waterfall. |
| Digi | Opens/closes the digital viewer. | FT8 and other available decoders. |
| Radio / SDR | Chooses the receive audio source. | Listening to the physical uSDX or the SDR receiver. |
| CH − / CH + | Steps through the channel logic. | Moving quickly between positions. |
| PTT | Switches RX/TX. | Manual transmit. |
| BAND | Changes band/preset and can coordinate the OWRX profile. | Jumping from 40 m to 20 m without digging into menus. |
| MODE | Cycles through LSB, USB, CW, FM, and AM as needed. | Changing mode directly. |
| 1 · 2 · 3 · 4 | Shortcuts to the four assigned autocall macros. | Repetitive calls or audio macros. |
| Mem | Opens local memories. | Saving/recalling frequencies and modes. |
Real example: 40 m → 20 m
On a uSDX with three controls, the switch can force you to navigate band, mode, and then readjust the step. In PoorSDR4All those controls stay visible: BAND → MODE → step. The whole point of the program is exactly to cut down that kind of repetitive friction.
PoorSDR4All Settings: complete field-by-field reference
This section documents every control the user can find in the Settings window. It doesn’t just list them: it explains what each field is for, what the user should normally put there, and which options are best left untouched.
Settings works as a field reference. The chapters that follow explain how to use each function during real operation — tuning, audio, OpenWebRX+, spots, autocall macros, the web server, and integrations — and tie the procedure back to these parameters.
Save and Cancel
Save validates the values and applies the new configuration. Affected services are reconfigured when needed. Cancel closes the window without applying the changes. In Plugins, activation changes take effect after restarting PoorSDR4All.
The screenshots are examples
Serial ports, audio device names, IP addresses, frequencies, paths, and credentials depend on each station. Use the screenshots to locate the fields; use your own machine’s real values.
Radio / CAT — connecting to the uSDX and control services
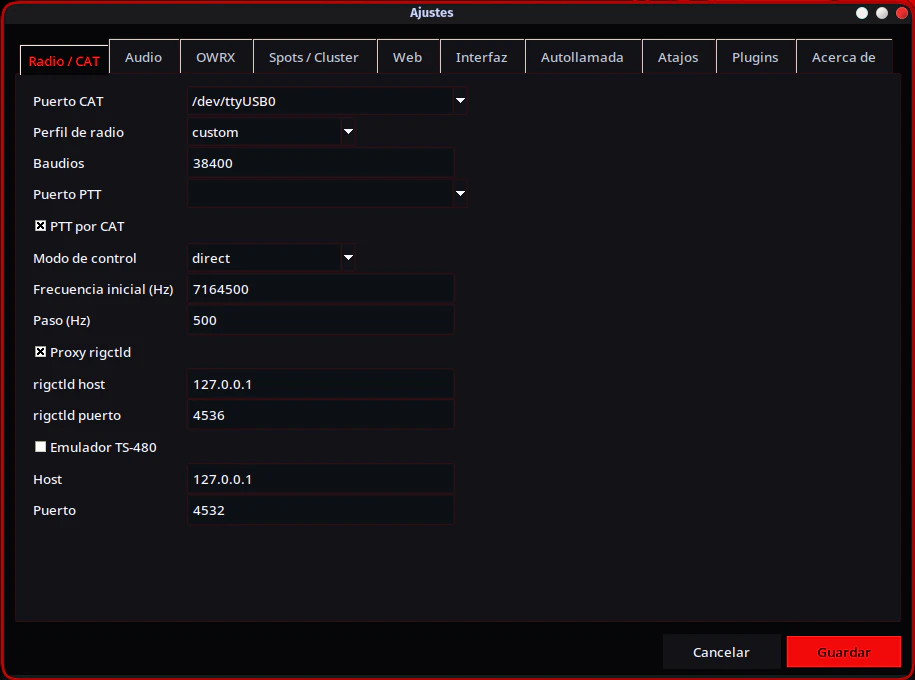
Recommended setup for most users
Use Control mode = direct so PoorSDR4All physically controls the uSDX, and leave rigctld Proxy enabled if you want to connect WSJT-X or other compatible programs. Don’t switch Control mode to hamlib just to use WSJT-X. Those are two different functions.
| Setting | What it’s for | How to use it | Default value / note |
|---|---|---|---|
| CAT port | The serial port PoorSDR4All uses to talk to the uSDX. | Select the device that shows up when you plug in the radio: for example /dev/ttyUSB0, /dev/ttyACM0, or a COM port on Windows. The dropdown fills in with detected ports and also accepts manual editing. | Empty until you select the radio. |
| Radio profile | Applies a communication template. | custom allows manual setup. generic-ts480 is meant for the dialect commonly used by uSDX rigs. trusdx-115200 is meant for modern (tr)uSDX firmware at 115200. | custom. The modern (tr)uSDX profile still needs broad physical validation. |
| Baud rate | CAT serial link speed. | Use whatever your firmware requires. With a named profile, the template can set the speed; with custom, you set it yourself. | 38400. |
| Control mode | Decides who opens the physical radio. | direct: PoorSDR4All opens the CAT port directly; this is the normal option. hamlib: an advanced scenario where PoorSDR4All reaches the radio through an existing external rigctld. | direct. |
| Starting frequency (Hz) | Fallback frequency when the console starts. | Used if the radio doesn’t respond correctly when PoorSDR4All tries to read its initial state. Given in hertz. | 7074000 Hz. |
| Step (Hz) | Starting VFO tuning step. | The initial increment when you move the VFO. You can change it afterward from the console’s step selector. | 500 Hz. |
| rigctld Proxy | Turns on the TCP server for external programs that support rigctld. | Turn it on to connect WSJT-X and other clients without handing them the physical serial port. PoorSDR4All stays the owner of the real CAT connection. | On. |
| rigctld host | Address the proxy listens on. | 127.0.0.1 only allows connections from the same computer. For another device on your LAN, you’ll need a reachable address and correctly configured networking. | 127.0.0.1. |
| rigctld port | Proxy’s TCP port. | Use this same number as the Network Server in the external program. If you change it here, change it in the client too. | 4536. |
| TS-480 emulator | Turns on a second network interface for programs that don’t use rigctld but do speak a Kenwood TS-480-compatible stream. | Leave it off if all your programs can use rigctld. Only turn it on for software that genuinely needs that emulation. | Off. |
| Host (TS-480 emulator) | The emulator’s listening address. | Normally 127.0.0.1 if the client is on the same PC. | 127.0.0.1. |
| Port (TS-480 emulator) | Emulator’s TCP port. | The external program should connect here using whatever network transport it supports for a compatible radio. | 4532. |
WSJT-X: the setting that matters is the rigctld Proxy
If PoorSDR4All is controlling the uSDX in direct mode, WSJT-X must not open the uSDX’s serial port. It connects to PoorSDR4All’s proxy instead, normally at 127.0.0.1:4536. See the full WSJT-X guide.
Audio — what comes in, what goes out, and what the operator hears
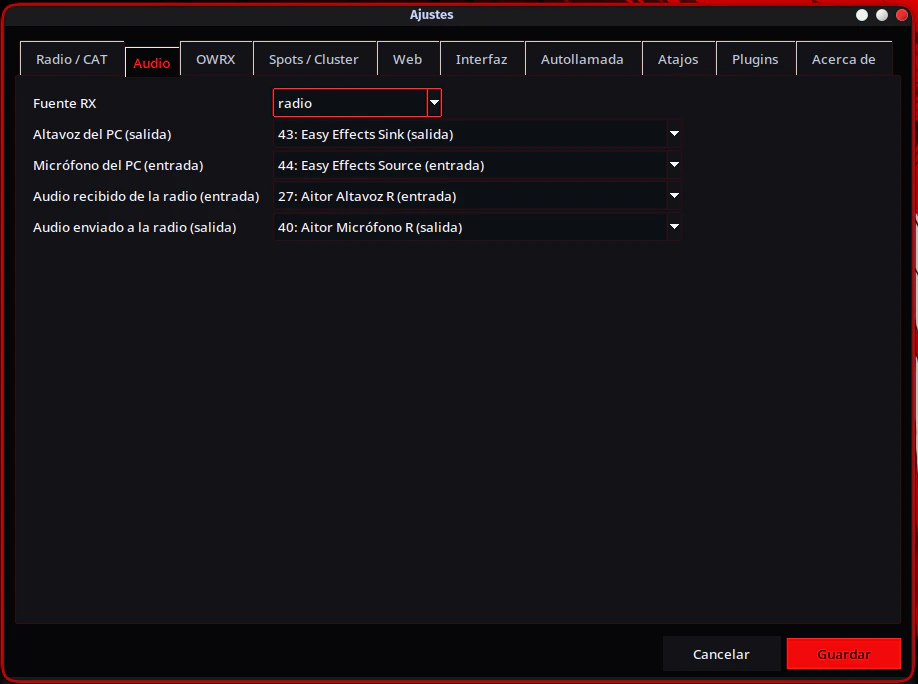
| Setting | What it’s for | What to select | Note |
|---|---|---|---|
| RX source | Selects the source PoorSDR4All uses for reception. | radio: audio received physically from the uSDX. sdr: stream coming from OpenWebRX+/SDR. | sdr as the software’s starting value. |
| PC speaker (output) | The device you listen to reception on. | Speakers, headphones, or a virtual output where you want to monitor RX. | No device selected until you set up the station. |
| PC microphone (input) | Voice source PoorSDR4All can use to transmit. | Your physical microphone or a virtual input. | No device selected. |
| Audio received from the radio (input) | The PC input carrying the uSDX’s RX audio in. | The physical or virtual input connected to the radio’s audio output. | No device selected. |
| Audio sent to the radio (output) | The PC output feeding the uSDX’s transmit audio. | The physical or virtual output connected to the radio’s audio input. Start at low levels. | No device selected. |
rigctld doesn’t carry audio
The rigctld proxy only carries radio control. WSJT-X and other programs must set up their own audio input and output separately, using your station’s real or virtual sound interfaces.
OWRX — OpenWebRX+ integration, waterfall, and band tracking
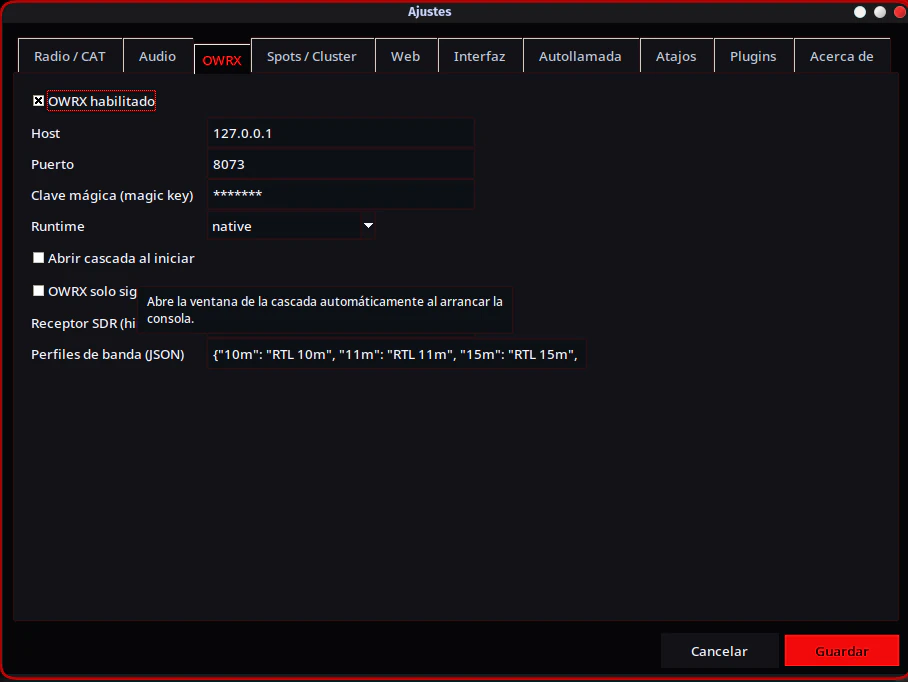
| Setting | What it’s for | How to set it up | Default value / note |
|---|---|---|---|
| OWRX enabled | Turns the whole OpenWebRX+ integration on or off. | Turn it off if you only want to use PoorSDR4All as a CAT/audio console with no SDR backend. | On. |
| Host | OpenWebRX+ server address. | 127.0.0.1 if it runs on the same PC; if OWRX is on another machine, use its IP or network name. | 127.0.0.1. |
| Port | OpenWebRX+’s web/API port. | Must match your OWRX install’s real port. | 8073. |
| Magic key | Key used to access/control the OpenWebRX+ instance when it applies. | Enter the key configured in your OWRX. This is not PoorSDR4All’s own web server password. | Hidden field. |
| Runtime | Says how OpenWebRX+ is deployed. | native for a local install managed as a service; docker when OWRX runs in a container. | native. |
| Open waterfall on startup | Decides whether the waterfall viewer opens automatically at launch. | Turn it on if you always operate with the waterfall; leave it off if you prefer to open it by hand. | Off. |
| OWRX only follows the app | Controls the direction of syncing. | On: changes from PoorSDR4All are sent to OWRX, but changes made from OWRX’s own web UI shouldn’t move the console. Off: syncing can work in both directions. | Off. |
| SDR receiver (hint) | Helps identify which OWRX receiver to use. | Only type a name if you need to disambiguate. Empty allows whatever selection/autodetection your install provides. | Empty. |
| Calibrated S-meter | Selects a fixed scale instead of noise-floor auto-calibration. | Only turn it on after measuring a reference S9 signal with the SDR receiver’s gain fixed manually. | Off. |
| S9 reference (dBFS) | Sets which OpenWebRX+ dBFS reading corresponds to S9. | Enter the value measured with the reference signal. Only used when Calibrated S-meter is on. | -30 dBFS to start; replace it with your own measurement. |
| Noise floor (S) | Sets which S unit the automatically detected background noise/ambient QRM is shown at. | Set it between S0 and S9 based on your station’s usual noise. Only used with Calibrated S-meter off, and applies on the fly. | S5, matching prior behavior. |
| Band profiles (JSON) | Maps each PoorSDR4All band to the exact name of its OpenWebRX+ profile. | Must be valid JSON, e.g. {"40m":"RTL 40m","20m":"RTL 20m"}. Names must match OWRX exactly. | Includes the 160 m to 10 m map from the reference template. |
Spots / Cluster — source and duration of DX alerts
| Setting | What it’s for | How to set it up | Default value / note |
|---|---|---|---|
| Duration of each spot (min) | How long a spot stays visible. | Raise the value if you want to keep alerts longer; lower it for a cleaner waterfall. | 10 min. |
| Source | Chooses where spots come from. | mqtt uses a broker/topics; telnet uses a classic DX cluster. | mqtt. |
| MQTT URL | MQTT/WebSocket broker address. | Enter the full URL provided by the service. Only used with Source = MQTT. | May come preconfigured by the project. |
| MQTT topics | Topics the client subscribes to. | Enter the topics separated by commas. | Preconfigured list in the template. |
| MQTT user | Broker user. | Leave empty if authentication isn’t required. | Empty. |
| MQTT password | Broker password. | Leave it empty if it’s not needed. | Empty. |
| Telnet host | DX cluster server over Telnet. | Enter the cluster host you use. Only used with Source = Telnet. | Empty. |
| Telnet port | Telnet cluster’s TCP port. | Use the port published by the cluster. | 7300. |
| Telnet callsign | The callsign you identify with. | Enter your callsign when the service requires it. | Empty. |
| Telnet password | Telnet cluster password. | Leave it empty if the server doesn’t ask for it. | Empty. |
This tab sets the source and the retention time. Which spot types are shown is handled from the Spots button on the main console.
Web — remote control from a browser
| Setting | What it’s for | How to set it up | Default value / note |
|---|---|---|---|
| Web server | Enables the remote control panel. | Turn it on once you’ve set a password and need browser access. | Off. |
| Host | Address the server listens on. | Use 127.0.0.1 for access only from the PC itself. To reach it from another device on your LAN, use 0.0.0.0. | 127.0.0.1. |
| Port | Web panel’s TCP port. | Keep 8080 unless it’s already in use or you need a different one. | 8080. |
| Allow WAN | Allows connections coming from outside the LAN. | Doesn’t open any router port or configure the firewall. Because the server is still experimental, leave it off and use a VPN if you access it from the Internet. | Off. |
| Automatic HTTPS | Generates a self-signed certificate and serves the panel over https://. | Turn it on to access it from another device. If it’s off and you haven’t set ssl_cert and ssl_key manually, the server uses http://. | Off. |
| User | Web panel username. | You can keep it or replace it with another one. | admin. |
| Password | Protects access to the web panel. | Required: without a configured password, the server won’t start. PoorSDR4All only stores the hash and the salt, never the plain-text password. If one already exists, leaving the field empty keeps the current one. | Empty on first run. |
Pressing Save applies the settings on the fly. PoorSDR4All restarts the web server when a parameter that affects its operation changes; there’s no need to restart the whole console.
Don’t expose radio services directly to the Internet
The web server, rigctld, the TS-480 emulation, and OpenWebRX+ are separate services. Keep CAT and the control ports on localhost or on a controlled LAN whenever possible.
Interface — language, theme, and starting mode
| Setting | What it’s for | Options / usage | Default value |
|---|---|---|---|
| Language | Selects the language of the text. | Spanish, English, French, German, Italian, Portuguese, Turkish, Polish, Russian, Galician, Catalan, and Basque. In this Alpha, some text may still not be wired into the translation system. | es. |
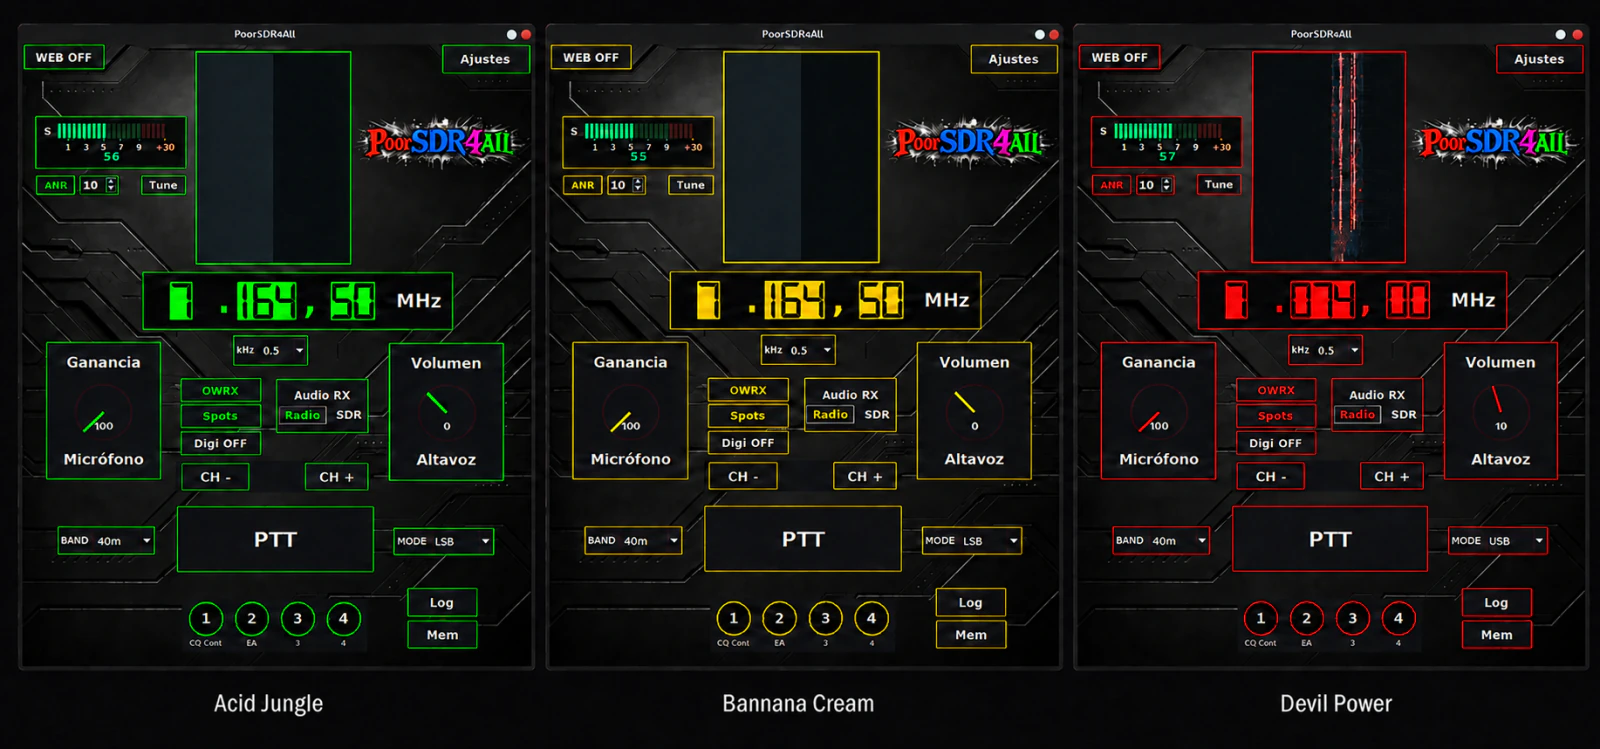
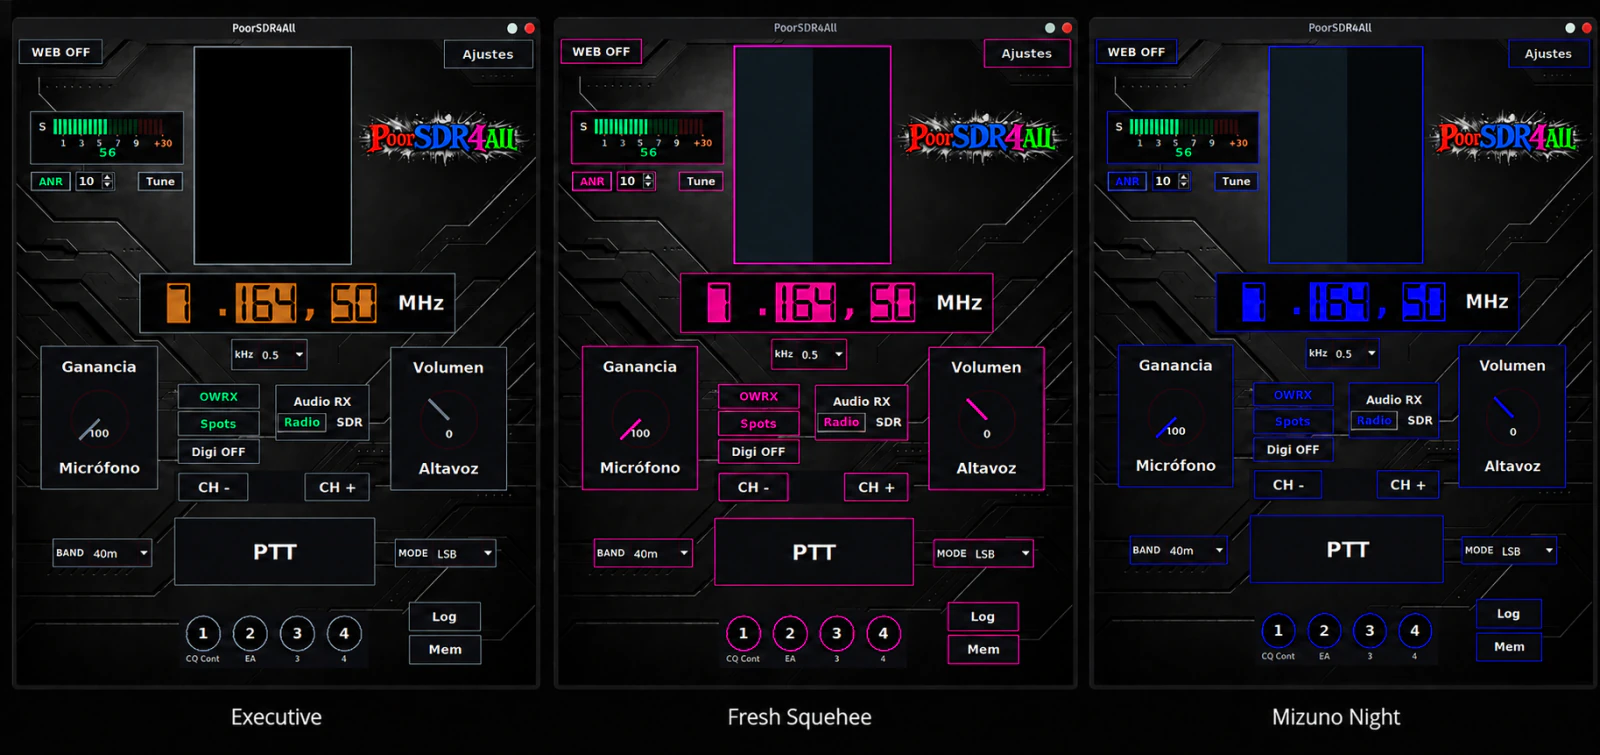
| Theme | Changes the look of the console and the waterfall. | Executive, Devil Power, Bannana Cream, Acid Jungle, Mizuno Night, and Fresh Squishee. It’s a visual preference; it doesn’t change CAT or RF. | Devil Power. |
| Default mode | Mode the console starts in. | Options: LSB, USB, CW, FM, and AM. | USB. |
Autocall — the 10 profiles and the console’s 4 buttons
| Control | What it’s for | How to use it |
|---|---|---|
| # 1…10 | Fixed number of the macro slot. | The number identifies the macro and is what you later pick under Button 1…4. An empty row can be left unconfigured. |
| Name | Label to recognize the macro. | Type a useful name. It isn’t sent to the radio. |
| Audio | File played when the macro fires. | Selected with the … button. The picker accepts WAV, MP3, OGG, and FLAC. |
| … | Opens the file picker. | Use it to choose the audio; the path is shown in the field. |
| Reps. | How many times the file repeats. | Must be a positive integer. If a valid profile doesn’t specify another value, the baseline behavior is a single repeat. |
| Interval (s) | Pause between repeats. | Given in seconds; can be 0. |
| Button 1 | Assigns a macro to the first round button. | Choose 1–10 or “unassigned”. |
| Button 2 | Assigns a macro to the second button. | Choose 1–10 or “unassigned”. |
| Button 3 | Assigns a macro to the third button. | Choose 1–10 or “unassigned”. |
| Button 4 | Assigns a macro to the fourth button. | Choose 1–10 or “unassigned”. |
Test your autocall macros before going on air
Check the file, the audio level, the gain, and that it correctly returns to RX. PoorSDR4All switches PTT via CAT; an audio macro doesn’t remove the need to keep an eye on your transmission.
Shortcuts — every action assignable, no exceptions
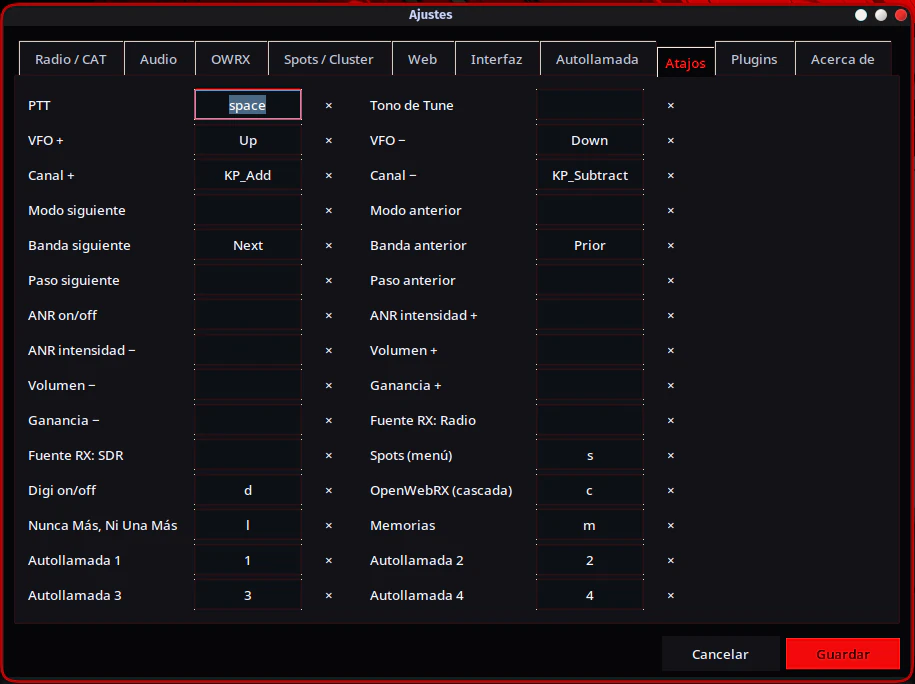
Click an action’s field and press the key you want to assign. The × clears the assignment. An action can also be left with no key at all.
| Action | What it does | Default key |
|---|---|---|
| PTT | Switches RX/TX via PoorSDR4All’s CAT PTT. | Space |
| Tune tone | Runs Tune. | Unassigned |
| VFO + | Raises the frequency by one step. | Up |
| VFO − | Lowers the frequency by one step. | Down |
| Channel + | Moves forward in the channel logic. | KP_Add |
| Channel − | Moves back in the channel logic. | KP_Subtract |
| Next mode | Moves to the next available mode. | Unassigned |
| Previous mode | Moves to the previous mode. | Unassigned |
| Next band | Moves to the next band. | Next / Page Down |
| Previous band | Goes back to the previous band. | Prior / Page Up |
| Next step | Selects the next tuning step. | Unassigned |
| Previous step | Selects the previous step. | Unassigned |
| ANR on/off | Turns noise reduction on or off. | Unassigned |
| ANR intensity + | Raises ANR intensity. | Unassigned |
| ANR intensity − | Lowers ANR intensity. | Unassigned |
| Volume + | Raises RX volume. | Unassigned |
| Volume − | Lowers RX volume. | Unassigned |
| Gain + | Raises TX chain gain. | Unassigned |
| Gain − | Lowers TX chain gain. | Unassigned |
| RX source: Radio | Switches reception to the uSDX’s physical input. | Unassigned |
| RX source: SDR | Switches reception to the SDR/OpenWebRX+ stream. | Unassigned |
| Spots (menu) | Opens the spots menu/filters. | s |
| Digi on/off | Opens or closes the Digi viewer. | d |
| OpenWebRX (waterfall) | Opens or closes the waterfall. | c |
| Nunca Más, Ni Una Más | Only available if the NMN1M project/plugin has been installed separately. Opens its logbook when PoorSDR4All detects it. | l |
| Memories | Opens the memories window. | m |
| Autocall 1 | Fires the first autocall shortcut. | 1 |
| Autocall 2 | Fires the second autocall shortcut. | 2 |
| Autocall 3 | Fires the third autocall shortcut. | 3 |
| Autocall 4 | Fires the fourth autocall shortcut. | 4 |
Plugins — enable or disable extensions
This tab lists the plugins it detected. Each plugin shows a checkbox: checked means active, unchecked means disabled. Changes take effect when you restart PoorSDR4All.
- Plugin name: identifies the detected extension.
- Enable checkbox: decides whether PoorSDR4All should load it on the next launch.
- Info text: shows the plugin’s identifier. The guide doesn’t depend on the specific state shown in a sample screenshot.
- With no plugins installed: PoorSDR4All still works; plugins are optional and additive.
About — project information
| Item | What it means |
|---|---|
| PoorSDR4All | Program name. |
| Version | Shows the app’s visible version; in this documentation, Alpha 1.0 / package 1.0.0a4. |
| Author | Identifies Acuántico Power as the project’s author. |
| acuanticopower.com/poorsdr4all | Link to the project’s official page. |
| License | Opens PoorSDR4All’s license information. |
| Acknowledgments | Informational block about the project; doesn’t change any option. |
| Ko-fi | Optional link to support the project. |
The About tab is informational only: it doesn’t store any operating parameters.
Optional Relays tab — only if the matching plugin is installed and active
PoorSDR4All can add tabs to Settings from plugins. The filter-relays plugin adds Relays; that’s why it doesn’t appear on every install. If it does appear, its fields are:
| Setting | What it’s for | Default value / note |
|---|---|---|
| WiFi relays | Turns on control of the per-band relay board. | Off. |
| ESP URL | HTTP address of the board that switches the relays. | Empty until you set up your hardware. |
| API key | Authentication key for the ESP, if your firmware uses one. | Empty. |
| Timeout (ms) | Maximum wait time for a request to the controller. | 700 ms. |
| Band groups (JSON) | Map linking bands to filter-bank groups/outputs. | Empty JSON until you define your setup. |
Tuning the uSDX from your PC: frequency, steps, bands, and modes
PoorSDR4All is built so changing frequency no longer has to depend constantly on the physical encoder. You can edit the frequency directly, move it with the keyboard/wheel, and pick a suitable step before you move.
| UI step | Increment |
|---|---|
| 0.01 kHz | 10 Hz |
| 0.1 kHz | 100 Hz |
| 0.5 kHz | 500 Hz |
| 1 kHz | 1,000 Hz |
| 5 kHz | 5,000 Hz |
| 10 kHz | 10,000 Hz |
| 100 kHz | 100,000 Hz |
The app exposes presets for 160, 80, 60, 40, 30, 20, 17, 15, 11, and 10 meters. Selecting a band can also coordinate the matching OpenWebRX+ profile.
| CAT code | Mode |
|---|---|
| 1 | LSB |
| 2 | USB |
| 3 | CW |
| 4 | FM |
| 5 | AM |
The app’s band setting is not an authorization to transmit
PoorSDR4All doesn’t replace the band plan and by itself doesn’t stop you from transmitting outside authorized frequencies. Always check the regulations, license class, and segment that apply to you.
PTT and Tune
PoorSDR4All’s PTT works exclusively over CAT. The app sends the TX; and RX; commands to the compatible uSDX through the same port and connection used to control frequency and mode.
If PTT over CAT doesn’t work
- First confirm frequency and mode work over CAT.
- Check the firmware and the compatible TX/RX commands.
- Confirm your radio’s firmware correctly supports the CAT TX and RX commands PoorSDR4All uses.
- If the radio gets stuck in TX, switch back to RX from the radio itself and don’t continue until you’ve found the cause.
Tune
Tune isn’t just a visual button. It generates a test tone and drives the actual transmit chain. Use it briefly, at moderate levels, and with a proper load/antenna.
uSDX audio on the computer: RX, TX, Radio/SDR, and ANR
RECEPTION FROM THE uSDX
uSDX → PC audio input → PoorSDR4All → PC speaker

RECEPTION FROM SDR
SDR/OpenWebRX+ → PoorSDR4All → PC speaker / Digi

TRANSMISSION
PC microphone or macro → PoorSDR4All → audio output to the radio → uSDX
PoorSDR4All keeps the PC’s speaker, the PC’s microphone, audio received from the radio, and audio sent to the radio separate. The RX source decides whether you hear the physical radio or the SDR.
ANR
With SpeexDSP available, ANR can be turned on and its intensity adjusted. Don’t assume more intensity is always better: start low and only raise it if it improves intelligibility.
uSDX + OpenWebRX+: waterfall, spectrum, and S-meter
OpenWebRX+ is a fundamental part of PoorSDR4All. While the console can be used partially without it, the full experience needs this backend to bring in SDR reception, the waterfall, the spectrum display, and the S-meter. PoorSDR4All takes care of integrating it into operation: a band change can select the SDR profile, the waterfall follows the console, and a click on it can send the tuning back to the radio.
OpenWebRX+ needs real receiving hardware: an SDR dongle or receiver capable of listening on HF, with a suitable antenna connected. Installing the server without an SDR that covers the bands you want doesn’t give you the reception experience it’s meant to provide.
A shared antenna requires automatic switching
Ideally, the SDR uses the same HF antenna as the radio, so the waterfall represents the signals actually reaching the station. To do this safely you must add an automatic RX/TX antenna switch: it must disconnect and isolate the SDR’s input before transmitting, and only return it to receive once TX has finished. The switch must be suited to the frequency and power in use and provide enough isolation. Without this protection, the transmitter’s RF can damage the SDR receiver.

- FFT and waterfall to see activity around the frequency.
- Zoom and panning in the viewer.
- Configurable per-band profiles.
- Markers and spots overlaid.
- Two-way tuning between the console and the waterfall.
- S-meter derived from dBFS, with auto-calibration and a configurable noise floor, plus an optional fixed scale.
About the S-meter
PoorSDR4All’s S-meter doesn’t come from the uSDX’s CAT: it’s calculated from the dBFS level that OpenWebRX+ reports. By default it auto-calibrates against the band’s background noise. The Noise floor (S) field lets you choose which S unit that detected ambient QRM is displayed at. Its starting value is S5, the same as before this setting was added, so behavior doesn’t change if you never touch it.
There are two ways to adjust the reading, and they shouldn’t be confused. In auto-calibrated mode, noise tracking is relative and Noise floor (S) just places that detected level at the S unit you chose. In fixed-scale mode, that field is ignored: the S-meter uses the convention of 6 dB per unit between S0 and S9 and 10 dB per unit above S9, anchored to the dBFS value you measured for a known S9 signal.
How to set up auto-calibrated mode
This is the default active mode, and it isn’t meant to turn dBFS into an absolute power measurement. It’s there so the scale stays consistent with each station’s usual QRM level.
- Leave Calibrated S-meter off.
- Tune into a part of the band with no signals present and let PoorSDR4All track the background noise.
- Decide which S level that QRM normally represents at your station. You can use a receiver or instrument that’s already calibrated and connected under comparable conditions as a reference. If you don’t have a reliable reference, keep S5.
- In Settings → OWRX → Noise floor (S), enter the matching unit, between S0 and S9.
- Press Save. Tracking is readjusted and the change applies immediately, with no need to restart the console.
This value doesn’t claim the noise has some absolute power level: it only sets where the detected floor sits on the relative scale. You may need to change it if your antenna, radio environment, or the band you’re using has a different QRM level.
How to calibrate the fixed scale with an S9 reference
Use this procedure if you need a referenced reading instead of the relative scale. The calibration only stays valid as long as the SDR receiver’s gain and the rest of the receive chain stay the same.
- Manually fix the RTL-SDR’s gain in OpenWebRX+. Don’t use automatic gain. On a system install this is set in
/var/lib/openwebrx/settings.json; the template included in the source code is atassets/owrx/settings.json. The profile field isrf_gain. - Feed the antenna input a signal of known power. A calibrated signal generator is the best option. For S9 on HF you can use
-73 dBmas a reference; if you don’t have a generator, you need a source and an attenuation whose final level you can determine with enough precision. - Tune the reference signal and note the exact dBFS value OpenWebRX+ shows.
- Open Settings → OWRX, enter that reading under S9 reference (dBFS), and turn on Calibrated S-meter.
- Press Save. The new scale applies immediately, with no need to restart the console.
If you change the SDR gain, the receiver, the profile, any attenuators, or anything else that affects the received level, you must repeat the calibration. A fixed reading with a different chain is no longer correctly referenced.
To go back to auto-calibrated mode, turn off Calibrated S-meter. The value saved in S9 reference (dBFS) is kept, but stops being used; the S-meter goes back to placing the detected noise at the unit set by Noise floor (S).
FT8 with uSDX: Digi and digital modes
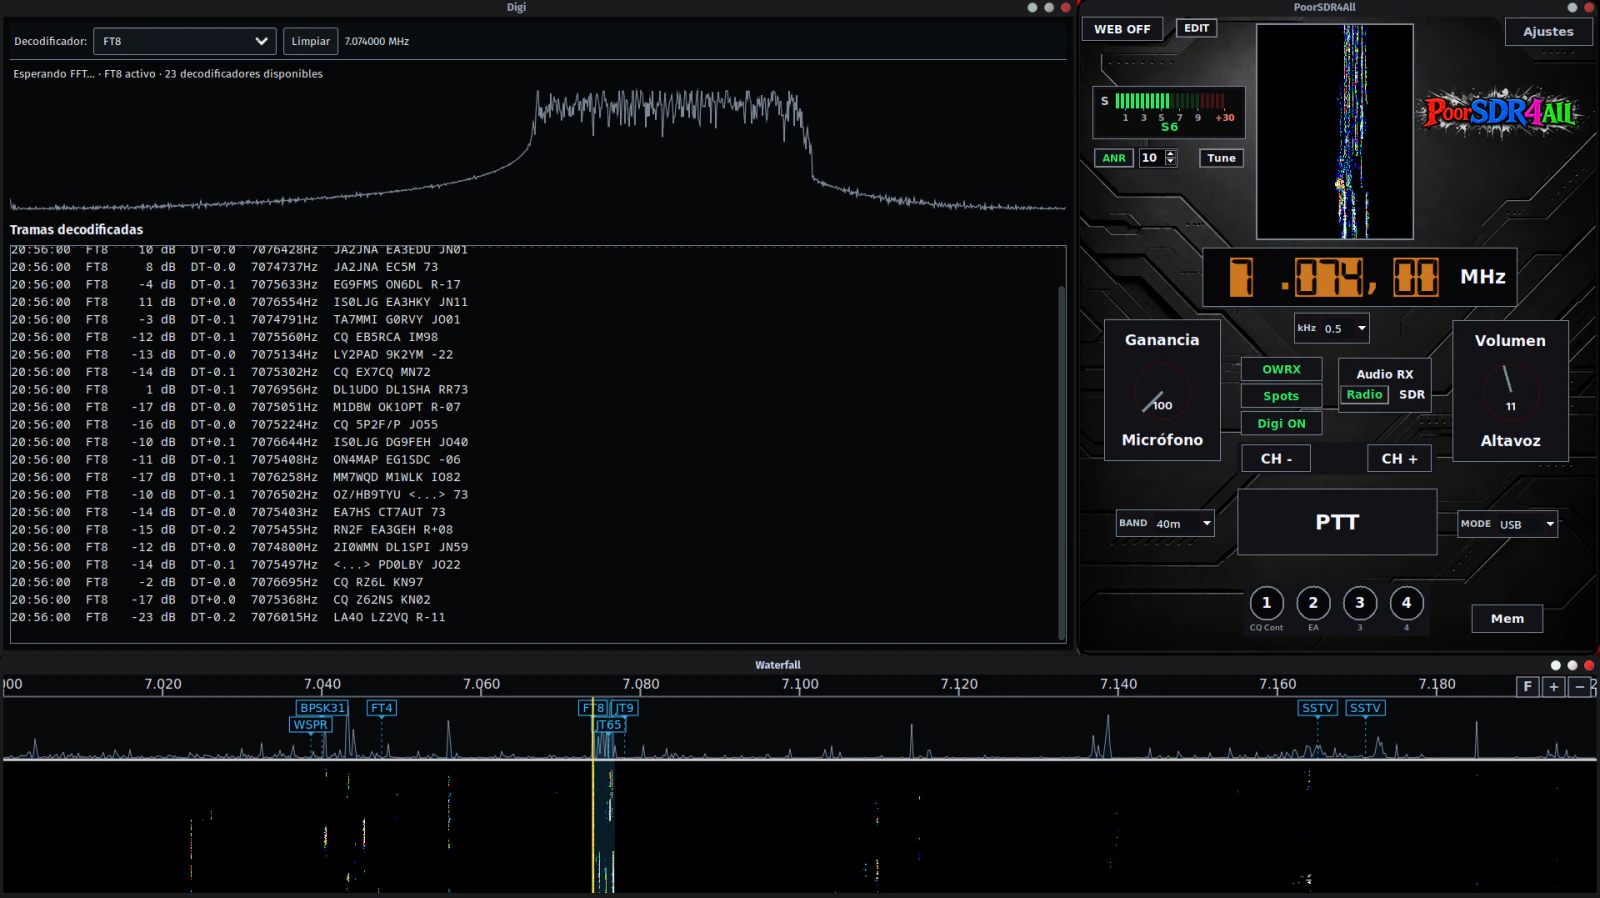
Digi shows the digital activity it receives from the backend and the decoders available. With FT8 active on the backend, it lets you see the decoded frames while the console and the waterfall stay visible. This function is independent of the console’s five selectable modes: LSB, USB, CW, FM, and AM.
The availability of FT8, FT4, JT65, WSPR, or other modes depends on the decoding environment you have installed. PoorSDR4All shouldn’t be described as a self-contained universal decoder that bundles all those engines inside the main package.
To make FT8 QSOs, use WSJT-X and connect it to PoorSDR4All through the rigctld proxy. See the full WSJT-X setup.
FT8 checklist
- The PC’s clock is correctly synced.
- The frequency and mode are correct.
- CAT is stable.
- There’s a visible signal on the waterfall.
- The matching decoder is available.
- Audio levels aren’t clipping.
- If you’re going to transmit: PTT, duty cycle, power, and cooling are under control.
Spots and DX Cluster
Spots can arrive over MQTT or a Telnet cluster. The point isn’t just reading a list: they can be plotted on the waterfall to turn DX information into part of the tuning workflow.
- Configurable duration for each spot.
- Type filters from the console.
- MQTT source with URL, topics, and credentials.
- Telnet source with host, port, callsign, and password.
Frequency memories
PoorSDR4All’s memories locally save name, frequency, and mode and let you return to that spot later without repeating all the navigation. The app can infer the band based on proximity to its reference frequencies.
These aren’t the uSDX’s internal memories
Recalling a memory makes PoorSDR4All tune the radio. It doesn’t write the EEPROM or program the firmware’s internal channels.
Autocall: audio macros
You can define up to 10 macros with a name, an audio file, repeat count, and interval, and assign four of them to the console’s four visible buttons. The current version lets you pick WAV, MP3, OGG, or FLAC files from the file dialog.
- Test the file off-air first.
- Start with low gain.
- Check the output level going to the radio.
- Confirm PTT returns to RX when it finishes.
- Follow the identification and automatic-operation rules that apply to you.
Keyboard shortcuts
Shortcuts are designed so that once you’re used to the console, many actions can be done without taking your hand off the keyboard.
| Action | Action |
|---|---|
| PTT | Tune |
| VFO + | VFO − |
| Channel + | Channel − |
| Next mode | Previous mode |
| Next band | Previous band |
| Next step | Previous step |
| ANR on/off | ANR intensity + / − |
| Volume + | Volume − |
| TX gain + | TX gain − |
| RX source: Radio | RX source: SDR |
| Spots | Digi on/off |
| OpenWebRX / waterfall | Memories / autocall macros, as assigned |
Remote control via the web server
PoorSDR4All includes an optional web server for operating from another device or from your phone. It ships turned off, and the project requires you to set the credentials and the signing secret before you can start it.
Warning: remote access is at an early stage
PoorSDR4All’s web server and remote-access features are experimental and at a very early stage of development. They may contain bugs, behave unexpectedly, and have functions that are still incomplete or unfinished. They must not be exposed directly to the Internet: don’t open or forward router ports to them. Turning on “Allow WAN” only enables access from other network addresses; it doesn’t turn the service into an Internet-ready application.
If you want to experiment from outside your home, use a VPN to reach your local network and expose to the Internet only the VPN service itself, properly configured and kept up to date. Once connected to the VPN, access PoorSDR4All as if you were inside the LAN. Don’t expose the CAT, rigctld, OpenWebRX+, or spiderd services directly either.
Setting up the remote web server (Settings → Web)
- Web server: turn it on.
- User: the default is
admin; you can change it. - Password: enter a strong password. It’s required, and the server won’t start if it’s not set. PoorSDR4All only stores its hash and salt, never the plain-text password.
- Host: keep
127.0.0.1if the panel should only be available on the machine itself. To reach it from a phone or another computer on the same LAN, use0.0.0.0, which listens on every interface. - Port: the default is
8080. - Allow WAN: not needed for normal use inside the LAN. This option allows connections from outside it, but it doesn’t open the port on your router or firewall, and it doesn’t make the service safe for the Internet. While this feature is still experimental, leave it off and use a VPN for any outside access.
- Automatic HTTPS: turn it on so PoorSDR4All generates a self-signed certificate and serves the panel over
https://. If you turn it off and don’t setssl_certandssl_keymanually, the panel is served overhttp://.
Pressing Save applies the configuration on the fly. If a parameter affecting how the server runs has changed, PoorSDR4All restarts only that service.
Accessing from another device
- With the server running, check the console’s log for the available addresses. For example:
https://<your-lan-ip>:8080
https://<device-name>:8080
https://localhost:8080- From your phone or another computer on the same WiFi or LAN, open
https://<device-ip>:8080. You need the LAN IP of the computer running PoorSDR4All:localhostand127.0.0.1only work from that same computer. - If you use automatic HTTPS, the browser will warn the first time that the self-signed certificate isn’t trusted. Confirm you’re going to the right address and explicitly accept to continue.
- Sign in with the user and password configured in Settings → Web.
- If WebRTC audio is available and working correctly on your install, press the panel’s audio button to try to set up the receive and transmit connection. Your browser will ask for microphone permission the first time. This part is also experimental and may have bugs or still-incomplete features.
Integrating other software: rigctld and TS-480 emulation
PoorSDR4All can remain the sole owner of the physical CAT port and offer radio control to other applications over the local network. This avoids the classic problem of two programs trying to open the same serial port at the same time.
| Path | Who it’s for | What the external program controls |
|---|---|---|
| rigctld Proxy | Programs that support Hamlib NET rigctl / rigctld. | They connect to PoorSDR4All’s proxy host and port; they don’t open the uSDX’s serial port. |
| TS-480 emulation | Other programs without rigctld support that can talk to a compatible radio over a network connection. | They connect to the emulator’s host/port and use the compatible command subset. |
The typical setup doesn’t change Control mode
For a uSDX physically connected to PoorSDR4All’s PC, the normal thing is to keep Control mode = direct and turn on rigctld Proxy. PoorSDR4All’s hamlib mode is for a different scenario: when the app itself needs to reach the radio through an external rigctld.
Programs that support rigctld
- First set up the uSDX in PoorSDR4All until frequency, mode, and PTT all work.
- In Settings → Radio / CAT, leave Control mode = direct.
- Turn on rigctld Proxy.
- If the client is on the same computer, use
127.0.0.1as the host. - Note the port; the default is
4536. - In the external program, select its Hamlib NET rigctl, Network rigctl, or equivalent option, and point it at PoorSDR4All’s host/port.
- Don’t set the uSDX’s physical serial port in that program: PoorSDR4All keeps it open.
Other programs without rigctld support
- Turn on TS-480 emulator in Settings → Radio / CAT.
- Set its Host and Port; the default is
127.0.0.1:4532. - In the external program, use its Kenwood TS-480-compatible radio/network mode, as long as it supports this kind of TCP connection.
- Remember the emulation covers the subset PoorSDR4All has implemented; it doesn’t turn the app into a full TS-480.
In both paths, PoorSDR4All receives the client’s changes, updates its own state, and applies them to the radio through its own CAT control.
Using WSJT-X with PoorSDR4All through the rigctld proxy
This is the recommended way to use WSJT-X with a uSDX controlled by PoorSDR4All. WSJT-X doesn’t compete for the serial port: PoorSDR4All keeps the physical CAT connection, and WSJT-X connects over TCP to the rigctld proxy.
Connection diagram
WSJT-X → Hamlib NET rigctl → 127.0.0.1:4536 → PoorSDR4All’s rigctld proxy → CAT → uSDX
Audio takes a different path: WSJT-X ↔ audio devices ↔ uSDX. rigctld doesn’t carry sound.
1. Check PoorSDR4All first
- Open PoorSDR4All and confirm the uSDX is connected over CAT.
- Change frequency from the console and confirm the radio follows.
- Switch LSB/USB and confirm the mode responds.
- Test PTT from PoorSDR4All and confirm TX and RX both work before bringing WSJT-X into it.
2. Set up the proxy in PoorSDR4All
| Field in Settings → Radio / CAT | Typical value for WSJT-X on the same PC | Why |
|---|---|---|
| Control mode | direct | PoorSDR4All directly controls the physical CAT port. |
| rigctld Proxy | On | Starts the server WSJT-X will connect to. |
| rigctld host | 127.0.0.1 | Limits the connection to the same computer. |
| rigctld port | 4536 | The port you need to repeat in WSJT-X. |
| TS-480 emulator | Not needed | WSJT-X can use Hamlib NET rigctl directly. |
3. Set up WSJT-X
In WSJT-X open File → Settings → Radio and set up the control like this:
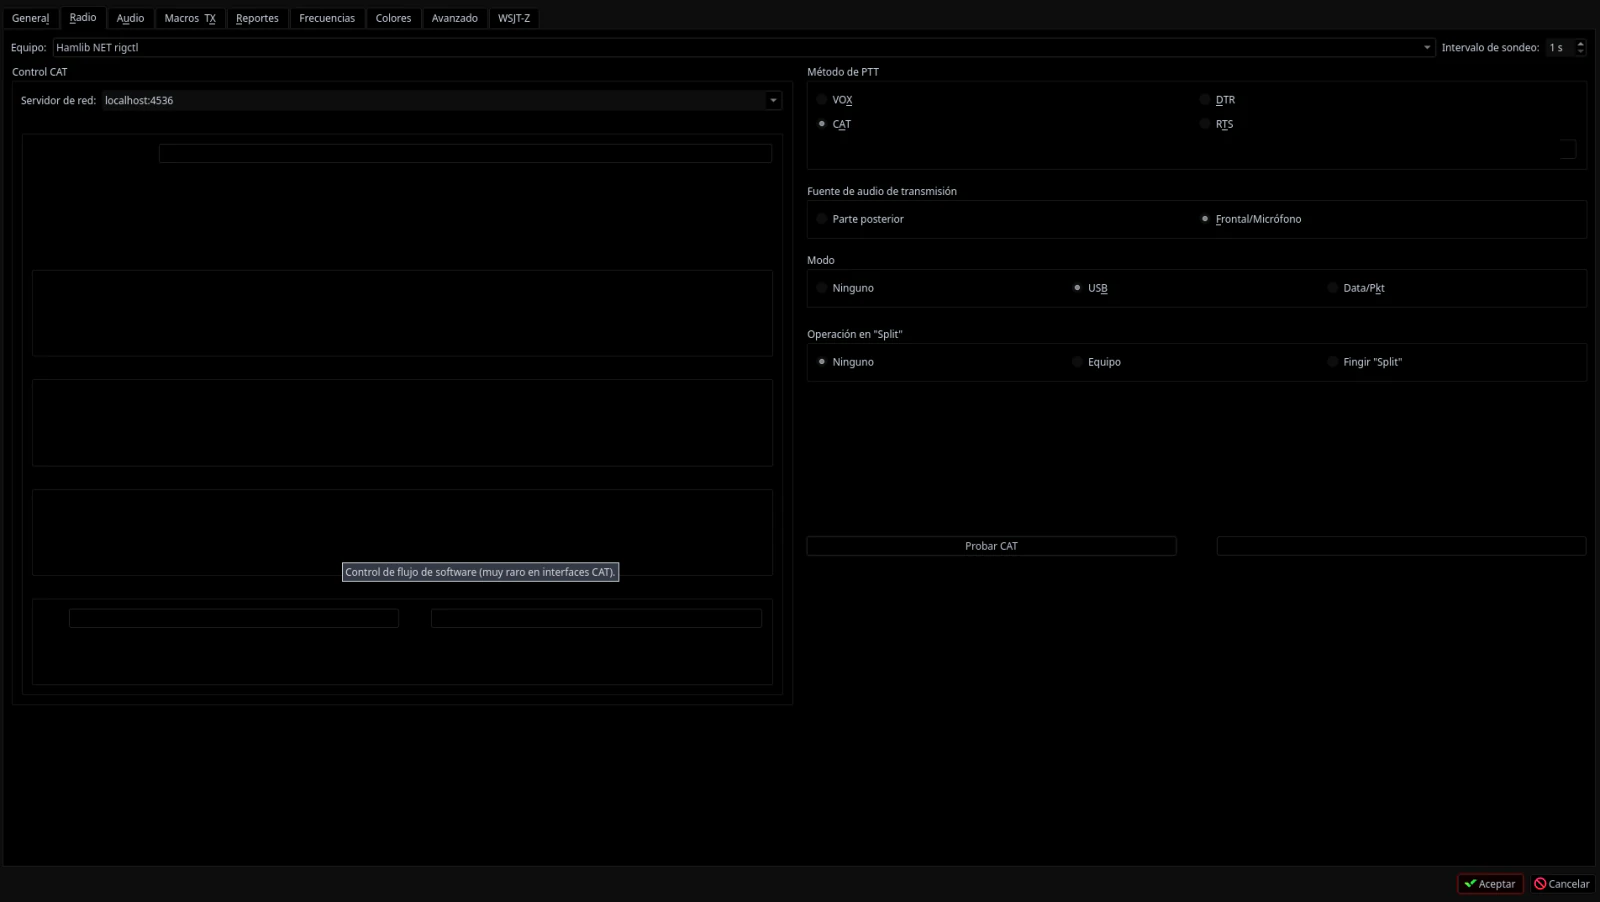
| Field in WSJT-X | What to enter | Explanation |
|---|---|---|
| Rig | Hamlib NET rigctl | WSJT-X will talk to PoorSDR4All’s proxy instead of opening the uSDX directly. |
| Network Server | 127.0.0.1:4536 | Use exactly the host and port set in PoorSDR4All. |
| Serial Port | Don’t use the uSDX’s physical port | The real CAT port is already open, held by PoorSDR4All. |
| Baud / Data / Stop bits | Not part of the physical link in this setup | The link between WSJT-X and PoorSDR4All is TCP over rigctld. |
| PTT Method | CAT | The PTT command travels through the proxy, and PoorSDR4All applies it to the uSDX over CAT. |
Don’t select /dev/ttyUSB0 or COMx in WSJT-X if you’re using the proxy
If WSJT-X opens the uSDX’s port directly while PoorSDR4All is also trying to use it, one of the two will fail or you’ll get a control conflict. That’s exactly what the proxy exists to prevent.
4. Use Test CAT and Test PTT
- Press Test CAT in WSJT-X. If it works, the TCP connection to the proxy is up.
- Press Test PTT for the shortest time needed, with the station ready. PoorSDR4All should reflect the state, and the uSDX should switch to TX over CAT.
- If Test CAT fails, check rigctld Proxy, the host, the port, your local firewall, and that PoorSDR4All is running.
- If Test CAT works but Test PTT fails, check again that PTT works directly from PoorSDR4All, and check the firmware’s CAT TX/RX compatibility.
5. Set up audio in WSJT-X
In WSJT-X’s Settings → Audio, select the input that receives audio from the uSDX and the output that feeds the transmit audio. If your station uses virtual interfaces, select those. The rigctld proxy doesn’t carry audio.
| Signal | Path |
|---|---|
| CAT / frequency / mode / PTT | WSJT-X → PoorSDR4All’s rigctld proxy → CAT → uSDX |
| RX audio for decoding | uSDX or receive chain → input device → WSJT-X |
| TX audio | WSJT-X → output device → uSDX audio input |
6. To work FT8
- Precisely sync your computer’s clock.
- Check the band and the working frequency.
- Verify WSJT-X is receiving audio and that signals show up in its waterfall.
- Adjust levels to avoid clipping.
- Before transmitting, verify CAT and PTT with the tests above.
- Make the contact from WSJT-X. PoorSDR4All’s Digi panel can serve as an extra viewer, but it doesn’t replace WSJT-X’s own operating interface.
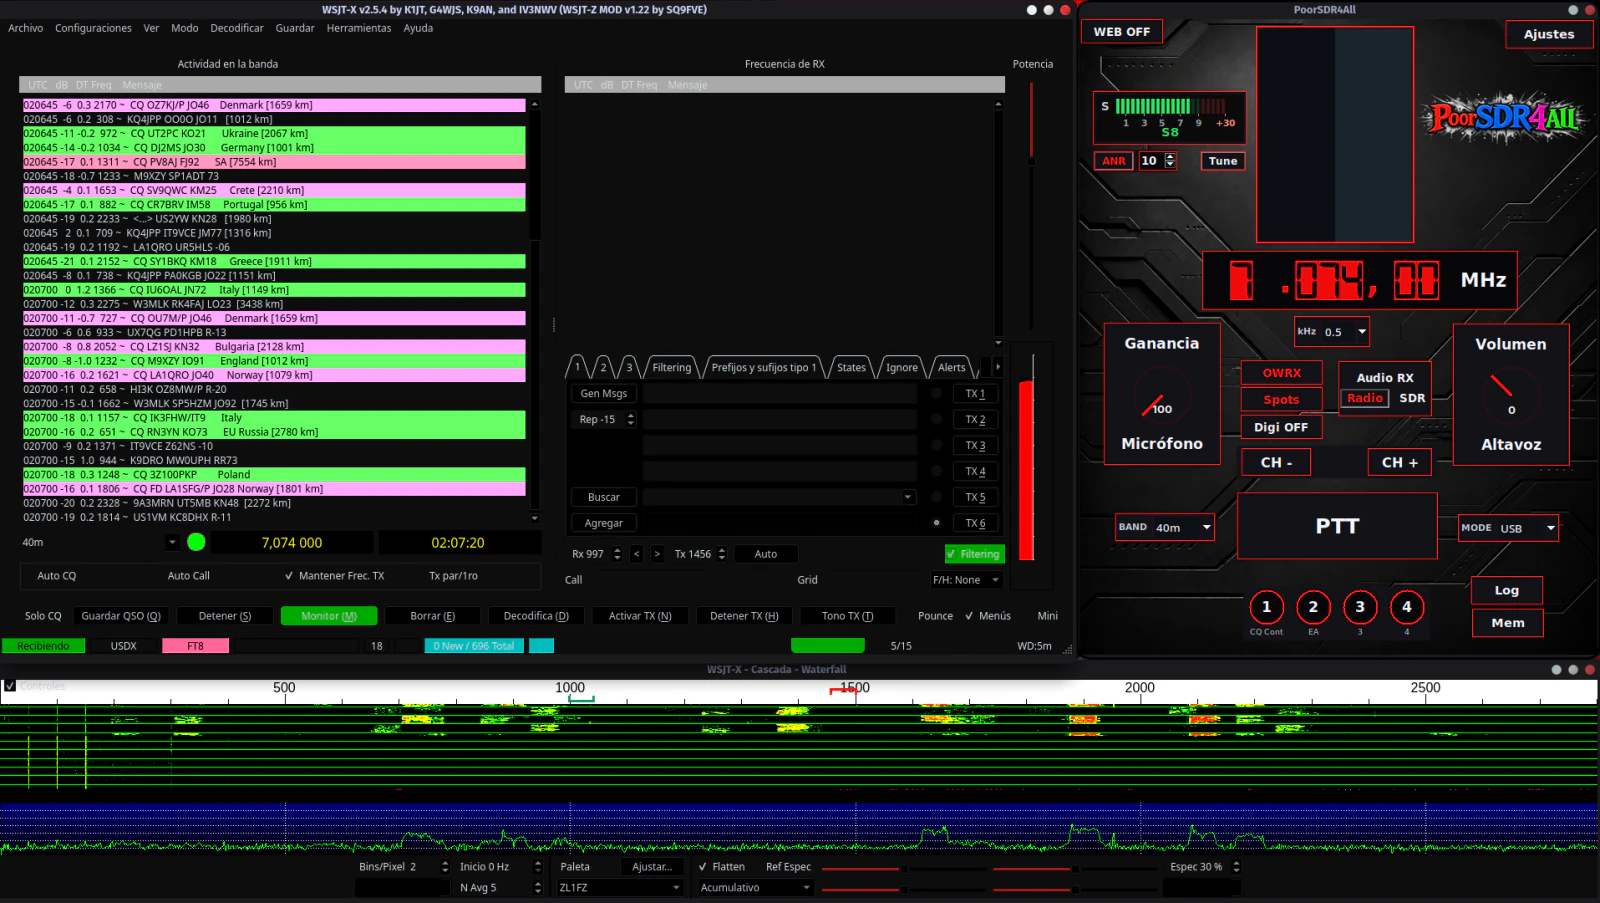
WSJT-X on another computer on the same network
You can also run WSJT-X on another machine on the LAN. In that case PoorSDR4All’s proxy must listen on an address reachable from that network, and WSJT-X must use IP_OF_THE_POORSDR_PC:PORT as its Network Server. Only do this inside a network you control, and apply a firewall; don’t publish rigctld directly to the Internet.
Common WSJT-X + PoorSDR4All problems
| Problem | What to check |
|---|---|
| Test CAT fails immediately | PoorSDR4All open, rigctld Proxy on, correct host/port, and the TCP port not already in use. |
| WSJT-X tries to open the COM/tty port | You’ve selected a plain serial radio instead of Hamlib NET rigctl. |
| CAT works but PTT doesn’t | Test PTT directly in PoorSDR4All first; check the firmware and the CAT TX/RX commands. |
| Frequency changes and jumps back | Check that no other client is controlling the same station and that you’re not mixing direct serial access with the proxy. |
| WSJT-X isn’t decoding | The CAT proxy doesn’t handle audio: check the clock, frequency, sound input, level, and signal. |
| WSJT-X connects on the same PC but not from another one | The proxy is probably only listening on 127.0.0.1; check the bind address, firewall, and LAN address. |
PoorSDR4All CAT reference for uSDX
CAT transport uses ASCII text ending in ;, 8N1 serial, no flow control, with timeout/reconnect logic.
| Function | Command |
|---|---|
| Query frequency | FA; |
| Set frequency | FA###########; |
| Query mode | MD; |
| Set mode | MDn; |
| Query status | IF; |
| Query ID | ID; |
| Transmit | TX; |
| Receive | RX; |
38400 or 115200
38400 is the reference speed for the project’s generic TS-480 profile. 115200 is reserved for the modern (tr)uSDX profile when its firmware requires it. The name “uSDX” alone isn’t enough to pick the speed.
Plugins
PoorSDR4All discovers installed extensions at startup as independent Python packages. They’re enabled or disabled one by one from Settings → Plugins tab; the change takes effect when you restart the console. The distributed tree includes Filter Relays. Other integrations, like NMN1M, are published and installed separately.
Nunca Más, Ni Una Más (NMN1M)
This is the logbook and QSO log that can add the “Log” button to the console. It isn’t distributed inside the PoorSDR4All repository: it has its own repository, license, documentation, and release cycle. Install it separately in the same environment following NMN1M’s official wiki so PoorSDR4All can discover it.
Filter Relays
Selects a remote filter bank per band via WiFi-controlled relays. Adds the “Relays” tab to Settings only if it’s installed and active.
Writing your own plugin
A plugin exposes an object with id, name, and a register(ctx) method that can add a background service, a button on the console, and/or an entire tab in Settings:
class MyPlugin:
    id = "my_plugin"
    name = "My plugin"

    def register(self, ctx):
        ctx.add_service(MyService(ctx.bus, ctx.config))
        ctx.add_console_button("my_button", "Label", self._abrir)
        ctx.add_settings_tab("My tab", (
            Field("my_section", "setting", "Field label", "bool"),
        ))

    def shutdown(self):  # opcional
        ...

PLUGIN = MyPlugin()
And in the plugin’s pyproject.toml, the entry point that makes it discoverable:
[project.entry-points."poorsdr.plugins"]
my_plugin = "my_package.plugin:PLUGIN"
With no plugin installed, the console works exactly the same — the plugin system is purely additive.
Where PoorSDR4All stores its configuration, and how to back it up
| Item | Linux | Windows |
|---|---|---|
| Configuration | ~/.config/poorsdr/ | %APPDATA%poorsdr |
| Data | ~/.local/share/poorsdr/ | %LOCALAPPDATA%poorsdr |
| Cache | ~/.cache/poorsdr/ | Depends on the component/runtime |
| File | Purpose |
|---|---|
config.json | Main configuration. |
layout.json | Interface positions/layout. |
memory.json | Local memories. |
poorsdr.log | Main log. |
cat_runtime.log | CAT diagnostics. |
waterfall_state.json | State/geometry of the waterfall viewer. |
digi_state.json | State/geometry of the Digi viewer. |
For a clean backup, stop PoorSDR4All and OpenWebRX+, copy the configuration and data directories, and protect those copies: they can contain hashes, local paths, or keys for services you’ve configured.
Recommended workflows
Operating SSB
- Connect CAT.
- Select a band.
- Choose LSB or USB.
- Select Radio or SDR.
- Adjust volume.
- Turn on ANR only if it helps.
- Tune in.
- Adjust TX gain.
- PTT.
- Return to RX and check.
Receiving with SDR and transmitting with uSDX
- Start OpenWebRX+.
- Press OWRX.
- Select RX = SDR.
- Choose a band.
- Look for activity on the waterfall.
- Click/tune in.
- Transmit with the uSDX when needed.
Working FT8 with WSJT-X
The correct flow is: PoorSDR4All keeps the uSDX’s CAT port, and WSJT-X connects to the rigctld proxy. Don’t connect WSJT-X directly to the same serial port.
- Sync the computer’s clock.
- Confirm PoorSDR4All controls the uSDX’s frequency, mode, and PTT.
- Turn on rigctld Proxy; for the same PC, normally use
127.0.0.1:4536. - In WSJT-X select Hamlib NET rigctl and use that host/port as the Network Server.
- Set PTT Method = CAT and run Test CAT / Test PTT.
- Set up WSJT-X’s audio input and output separately.
- Operate FT8 from WSJT-X. Digi and OpenWebRX+ can stay open as visual support.
See the full procedure in Using WSJT-X with PoorSDR4All through the rigctld proxy.
Creating a memory
- Go to the frequency/mode you want.
- Open Mem.
- Enter a name.
- Save.
- Recall it later to tune back in.
Troubleshooting uSDX + PoorSDR4All
| Symptom | What to check |
|---|---|
| PoorSDR4All won’t start | Python 3.11+, Tkinter, and dependencies installed. |
| The uSDX doesn’t show up in CAT port | Data cable, driver, /dev/ttyUSB*//dev/ttyACM*, or COM port. |
| Permission denied on Linux | Your distro’s serial group (dialout, uucp, etc.) and a fresh login session. |
| Port already in use | Another rigctld, WSJT-X/flrig opening the serial port directly, a serial terminal, or another running instance. |
| WSJT-X: Test CAT fails | Check that rigctld Proxy is on, that WSJT-X uses Hamlib NET rigctl, that the Network Server matches host:port, and that PoorSDR4All is running. |
| WSJT-X: Test CAT works but Test PTT fails | Check PTT directly from PoorSDR4All first, then the firmware’s CAT TX/RX compatibility. |
| WSJT-X on another PC can’t reach the proxy | 127.0.0.1 only accepts the local machine. Check the listen address, LAN IP, and firewall; don’t expose rigctld to the Internet. |
| CAT opens but doesn’t change frequency | Profile, baud rate, firmware, cable, and cat_runtime.log. |
| PTT over CAT doesn’t work | First confirm frequency and mode work over CAT; then check the profile, speed, firmware, and compatible TX/RX commands. |
| The radio stays stuck in TX | Stop TX from the radio itself, and don’t continue until you’ve checked CAT communication and the TX/RX state. |
| No audio at all | RX source, input endpoint, speaker, volume, and whether the device is locked. |
| Choppy audio | Sample rate, channels, CPU load, and audio backend. |
| ANR makes the signal worse | Lower the intensity or turn it off. |
| OpenWebRX won’t open | Host/port, the service, and profile names. |
| Waterfall shows the wrong band | The band→profile map and OpenWebRX+’s actual profile names. |
| RTL-SDR doesn’t receive HF | Driver, direct sampling/upconverter/offsets, depending on the real receiver. |
| Digi is empty | Signal, decoder, the backend’s audio/demodulation, and the selected mode. |
| FT8 isn’t decoding | Clock, frequency, signal, bandwidth, and installed decoders. |
| No spots showing up | MQTT/Telnet source, network, credentials, and filters. |
| Web server won’t start | The web extra, port, user/password, and signing secret. |
| Web only works on localhost | Normal with a 127.0.0.1 bind; changing it is a network and security decision. |
| Corrupted configuration | Back up config.json, rename it, and let PoorSDR4All generate a clean configuration. |
| Corrupted memories | Removing memory.json clears the local list; it doesn’t change anything on the radio. |
Quick diagnostic commands on Linux
python --version
python -c "import tkinter"
ls -l /dev/serial/by-id/
ls -l /dev/ttyUSB* /dev/ttyACM* 2>/dev/null
Frequently asked questions about uSDX and PoorSDR4All
What is PoorSDR4All?
The operating console developed by Acuántico Power to work with radios in the uSDX family from your PC, bringing together CAT, audio, SDR reception, waterfall, digital modes, spots, memories, macros, and external interfaces.
Is PoorSDR4All official uSDX project software?
No. It’s an independent Acuántico Power project, designed specifically around operating with the uSDX and compatible variants.
What software can I use to control a uSDX from the PC?
Any program that understands the compatible CAT subset can control certain functions. PoorSDR4All is designed as a full console built around the uSDX, not just as a CAT client.
Does it work with (tr)uSDX?
There’s a dedicated 115200 profile for modern (tr)uSDX firmware. In the current Alpha, broad physical validation of that profile is still pending.
Which CAT speed should I use: 38400 or 115200?
It depends on your firmware. The project’s generic TS-480 profile uses 38400; the modern (tr)uSDX profile uses 115200 when that applies.
Do I need Hamlib?
Not for direct mode. Hamlib/rigctld is an advanced integration for station setups using external software.
Can I use WSJT-X?
Yes. The recommended setup is for PoorSDR4All to keep the physical CAT port and for WSJT-X to select Hamlib NET rigctl, pointing at PoorSDR4All’s proxy, normally 127.0.0.1:4536. Audio is set up separately in WSJT-X. See the step-by-step guide.
Does PoorSDR4All decode FT8?
Digi shows the decodes available from the installed backend. With the FT8 decoder active, it shows its frames while you actually work the contact from WSJT-X.
Do I need OpenWebRX+?
You can use PoorSDR4All partially without OpenWebRX+ for basic CAT control, radio audio, memories, and other console functions. That said, OpenWebRX+ is fundamental to what the project is about and is required for the full SDR reception, waterfall, spectrum, S-meter, and backend-related experience.
Do I need a second SDR?
For the full experience you need an SDR receiver compatible with OpenWebRX+ that can receive HF and has a suitable antenna connected. It can be on the same computer or connected to a remote OpenWebRX+ server; the uSDX’s basic CAT alone doesn’t produce the waterfall.
Can I connect the SDR and the uSDX to the same antenna?
Yes, and it’s the ideal setup, but only through an automatic RX/TX antenna switch that isolates the SDR before you transmit. Don’t connect both inputs directly to the same antenna, and don’t trust that protection to a common passive splitter: the transmitted energy can damage the SDR receiver’s front end.
Can I listen to the uSDX’s own receiver?
Yes. Select the Radio RX source and set up the audio endpoint that receives audio from the transceiver.
Can I receive with SDR and transmit with the uSDX?
Yes; it’s one of PoorSDR4All’s main workflows: visual reception with OpenWebRX+/SDR and transmit/control with the uSDX.
Is the S-meter the uSDX’s own?
No. It’s derived from the OpenWebRX+ stream’s dBFS level, not from the uSDX’s CAT. By default it’s relative and auto-calibrates against the background noise; each user can choose which S unit their ambient QRM is displayed at. You can also use a fixed scale referenced to S9 if you calibrate it with a known signal and keep the SDR’s gain fixed.
Can it read SWR or power from the uSDX?
Not through the CAT subset implemented in this Alpha release.
Does it program the uSDX’s internal memories?
No. It keeps local memories and tunes the radio when you recall them.
Does it work on Windows?
Yes, in Alpha. There is a graphical installer for Windows 10/11 that prepares WSL2 with Ubuntu 24.04, installs OpenWebRX+ in it, and connects the SDR over USB. It has been tested in a Windows 11 virtual machine, not yet with a real SDR. If you find any bug, please report it in Issues.
Does it work on Raspberry Pi?
There’s a planned install for Raspberry Pi OS 64-bit/arm64, but broad physical validation is still pending.
Does it work on macOS?
It isn’t announced as a supported or verified platform in this Alpha.
Where does it store its configuration?
In user directories: XDG on Linux and APPDATA/LOCALAPPDATA on Windows.
What license does it use?
Acuántico Power’s original code is source-available under the PolyForm Noncommercial License 1.0.0. Third-party components keep their own licenses.
uSDX / PoorSDR4All glossary
| Term | Meaning |
|---|---|
| ANR | Noise reduction applied to RX audio. |
| CAT | Digital control of the transceiver via commands. |
| COM | The usual name for a serial port on Windows. |
| dBFS | Digital level relative to the maximum representable value. |
| Digi | PoorSDR4All’s viewer for digital-mode activity. |
| DSP | Digital signal processing. |
| FFT | Transform used to represent energy per frequency. |
| FT8 | A digital mode widely used on HF. |
| Hamlib | Library/ecosystem for controlling radio equipment. |
| LSB / USB | Lower / upper sideband. |
| MQTT | Messaging protocol used here as a spot source. |
| OpenWebRX+ / OWRX | External SDR receiver server coordinated by PoorSDR4All. |
| PTT | Push To Talk: switching from receive to transmit. |
| rigctld | Hamlib’s server that exposes radio control over the network. |
| RTL-SDR | A family of USB SDR receivers. |
| RX / TX | Receive / transmit. |
| S-meter | Level indicator; in PoorSDR4All it’s derived from the SDR. |
| DX spot | An alert about an active station on a frequency. |
| uSDX | A family/project of QRP transceivers largely defined by software. |
| VFO | Control for the operating frequency. |
| Waterfall | A time-based representation of the spectrum, also called a cascade. |
Security
- The remote web server is off by default and refuses to start without a configured password and signing secret.
- Don’t expose the CAT, rigctld, spiderd, or OpenWebRX ports directly to the Internet.
- Only the latest version gets security fixes. OpenWebRX+, csdr, pycsdr, owrx_connector, SpeexDSP, and the other external projects maintain their own channels.
- Found a vulnerability? Don’t post exploitable details in a public issue: use the GitHub repository’s private Security advisories channel, or Acuántico Power’s contact form, noting “PoorSDR4All security”. Include the affected version, platform, impact, and minimal steps to reproduce it.
Architecture, for anyone who wants to contribute
PoorSDR4All is organized in layers to keep the interface, the radio logic, the configuration, and the external services separate. This structure lets you work on one part of the program without mixing it up with all the others.
poorsdr/
  infra/      user paths, logging, and EventBus
  config/     configuration model and persistence
  core/       CAT logic, bands, tuning, memory, waterfall, and S-meter
  services/   radio, audio, OpenWebRX+, web, memories, and integrations
  ui/         main console and Settings window
  viewers/    waterfall and Digi panel
  i18n/       language resources
  runtime.py  app composition and startup
Services are coordinated through an EventBus. That way, a change in frequency, mode, PTT, memory, or OpenWebRX+ status can propagate to the parts that need it without the interface having to directly control every component.
When you save Settings, the configuration is persisted and the affected services are reconfigured. When a change requires internally restarting an audio device, a socket, or a connection, the corresponding service can do it without forcing the user to close the whole application.
The repository includes automated tests and static checks to cut down on regressions. Even so, software tests are no substitute for validation with real radios, audio interfaces, and SDR receivers.
How to contribute
Bug reports and proposals are welcome without any formalities on the GitHub issue tracker. For code, documentation, or resources to be merged into the project:
- Open an issue describing large changes before implementing them.
- Keep each contribution focused, with tests where appropriate.
- Confirm in the pull request that you’ve read and accept the current version of the CLA (contributor license agreement) — the maintainer needs to be able to show that acceptance before merging anything.
- Explicitly declare any third-party code, data, or resources: origin, version, and license.
- Don’t include keys, private certificates, credentials, logs, or real user data.
The CLA lets Acuántico Power include your contribution in both the noncommercial and the commercial edition — but you keep the copyright to your own contribution. Changes to GPL or AGPL components are submitted separately and keep that component’s license: PoorSDR4All’s CLA doesn’t relicense third-party code. Contributions made on behalf of a company require that company’s authorization; the maintainer may ask for an additional corporate agreement.
Development environment
python -m pip install -e ".[dev,web]"
ruff check src tests
mypy src
pytest -q
License
PoorSDR4All’s original code is offered under the PolyForm Noncommercial License 1.0.0. It’s source-available, not OSI-approved open source software: you can use, modify, and distribute it for noncommercial purposes, but commercial use requires a separate agreement.
Some components and data keep their own licenses — AGPL, GPL, BSD, MIT, CC-BY, or public domain (OpenWebRX+, csdr, pycsdr, owrx_connector, owrx-spider, SpeexDSP, GeoNames, Natural Earth, flag-icons…). The exact revisions, changes, attributions, and full texts are in THIRD_PARTY_NOTICES.md and in the LICENSES/ directory of the repository.
For commercial use, contact Acuántico Power through the contact form. A commercial license for PoorSDR4All can only grant rights over code that Acuántico Power actually controls: it doesn’t turn the GPL or AGPL components into proprietary software, and it doesn’t remove the obligation to provide their source code where that applies.
Changelog
1.0.0a4 — Alpha
- Graphical installer for Windows 10/11: it installs the application, prepares WSL2 with Ubuntu 24.04, installs OpenWebRX+ and the spots service, and handles USB permissions for the SDR. Download it from the 1.0.0a4 release.
- Both installers (Linux and Windows) install NMN1M 1.0.0a2.
- The frequency display’s LED font is always 7LED, included in the package with its author’s readme.
- The buttons added by plugins (Log, Mem, RTTY…) are laid out in a column, without overlapping.
- The waterfall window can be made shorter, and its initial position stays on screen on low monitors.
1.0.0a3 — Alpha
- The installer no longer stops if
apt-get updatefails because of a third-party repository: it warns and continues with the available indexes.
1.0.0a2 — Alpha
- New optional plugin RTTY Power: RTTY with the uSDX, with its own decoder, macros, and aids for contests such as CQ WW RTTY.
- The graphical installer and
scripts/install.shcan install the optional RTTY Power and NMN1M plugins if you choose. - New Interface → My callsign setting, for plugins that need to identify you.
- Core support for digital-mode plugins: continuous receive audio, audio transmission in local mode, and adjusting the OpenWebRX+ waterfall selector width.
- When the OpenWebRX+ waterfall opens, CAT is read before sending it the frequency, and the waterfall no longer moves the radio unless the operator asks.
- Spots in USB, LSB, or PHO are classified as SSB.
- The main window identifies itself as “PoorSDR4All” in the taskbar.
- Saving the layout on a scaled screen no longer shifts or shrinks the elements.
1.0.0a1 — Initial Alpha
First public release of PoorSDR4All.
- Operating console for uSDX with CAT control of frequency, mode, and PTT.
- RX/TX audio management and choosing reception from Radio or SDR.
- Integration with OpenWebRX+ for waterfall, spectrum, an auto-calibrated S-meter with a configurable noise floor or an S9 reference, band profiles, and coordinated tuning.
- Digi panel for the decoders available in the installed environment.
- Spots / DX Cluster over MQTT or Telnet.
- Local memories, autocall macros, and configurable shortcuts.
- Optional web server and integration layers for external software.
- A plugin system independent of the core.
- Visual themes and centralized configuration.
- Graphical installers for Linux and for Windows 10/11 (the latter in Alpha).
- Automated tests, static analysis, and a reproducible build process.
The full version history is kept in CHANGELOG.md inside the repository.
Other tools from the lab
PoorSDR4All is part of a practical route through the Acuántico Power radio laboratory: start with Your first amateur radio rig, use NMN1M to log contacts, or see IRCB if you need an audio-and-PTT interface for another transceiver. Other projects include aprStar and Hamlib Launcher.
The uSDX is still small; your station no longer has to feel small
The uSDX’s appeal lies exactly in its philosophy: a lot of result from very little hardware. But that simplicity comes at a cost when every band change, mode, step, or setting sends you back to the same menu and the same encoder.
PoorSDR4All was born to fix that part of the experience. It doesn’t add watts, it doesn’t magically improve the RF filters, and it doesn’t turn the transceiver into a different rig. It uses the computer to put around the radio what the front panel can’t comfortably offer: instant CAT control, managed audio, an SDR view of the band, waterfall, spots, digital modes, memories, autocall macros, shortcuts, and integrations.
Let the uSDX keep the simplicity that makes it interesting, while using it from the PC feels much closer to working with a full SDR station.
PoorSDR4All is a project of Acuántico Power‘s own. This Alpha is being released so it can be used, tested against more uSDX variants, and improved with reproducible reports from the community.
PoorSDR4All
Source code and documentation for Acuántico Power's PoorSDR4All project.