Tutorial: How to Set Up a Server with LM Studio and Use It with Python
This tutorial explains how to start a model in LM Studio, set it up as a server, and build an interaction in Python using the provided script — in this case, a script that uses “speech_recognition” to hold a voice conversation with any model.
1. Set up LM Studio as a server
Step 1: Start LM Studio
- LM Studio must be installed and have a model available. If you do not know how to install it, see my installation tutorial.
- Open the application and go to the AI Chat tab.
Step 2: Load a model
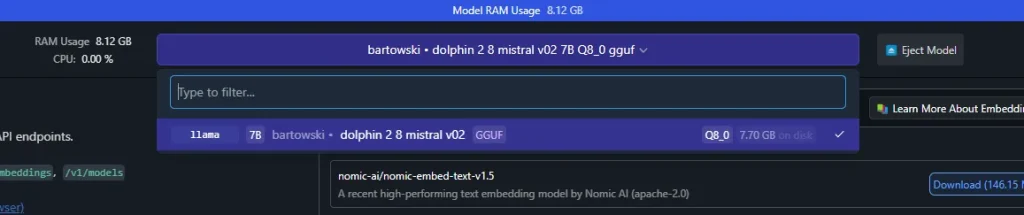
- Click “Select a model to load” and choose the model you downloaded earlier (for example, Llama or Mistral).
- Once it is loaded, check that the model is active in the interface.
Step 3: Enable the server
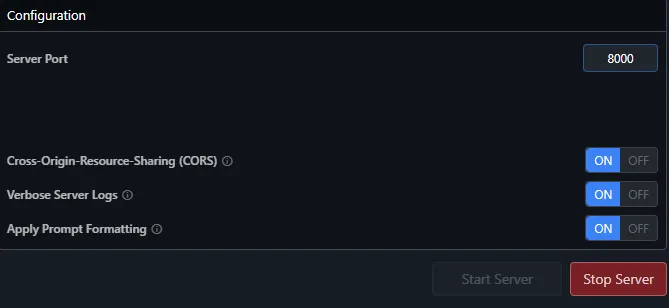
- Go to the Settings panel.
- Enable the options as shown in the figure above.
- Set the server port. By default it uses port
1234. You can change it if you prefer — to 8000, for example. - Click Start Server.
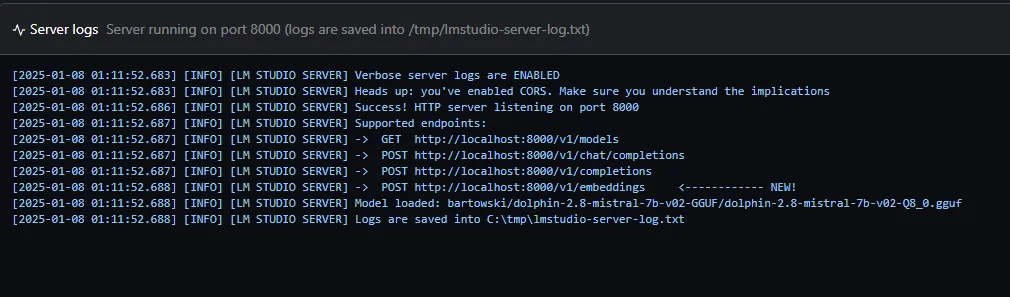
- Check that the server is running. LM Studio will show a message indicating that the server is up.
2. Set up the Python environment
Step 1: Install dependencies
Open a terminal and run the following command to install the required libraries:
pip install requests pyttsx3 SpeechRecognition
Step 2: Set up the script
Save this code to a file, for example chatvoz.py.
import speech_recognition as sr
import pyttsx3
import requests

# URL del servidor de LM Studio
SERVER_URL = "http://localhost:8000/v1"

# Configuración de síntesis de voz
engine = pyttsx3.init()
engine.setProperty("rate", 150)  # Ajusta la velocidad de la voz
engine.setProperty("volume", 1.0)  # Ajusta el volumen de la voz

# Función para reproducir texto en voz
def speak(text):
    engine.say(text)
    engine.runAndWait()

# Configuración inicial de la conversación (español)
history = [
    {"role": "system", "content": "Eres un asistente inteligente. Siempre respondes en español y das respuestas correctas, útiles y bien razonadas."},
]

# Función para obtener el modelo cargado actualmente en el servidor
def get_active_model():
    try:
        response = requests.get(f"{SERVER_URL}/models")
        if response.status_code == 200:
            models_data = response.json().get("data", [])
            if models_data:
                active_model = models_data[0]["id"]  # Seleccionar el ID del primer modelo
                print(f"🤖 Modelo activo detectado: {active_model}")
                return active_model
            else:
                print("❌ No hay modelos cargados en el servidor. Carga un modelo en LM Studio.")
                return None
        else:
            print(f"❌ Error al obtener modelos: {response.status_code} - {response.text}")
            return None
    except requests.ConnectionError:
        print("❌ No se pudo conectar al servidor de LM Studio.")
        return None

# Función para transcribir audio a texto
def transcribe_audio():
    recognizer = sr.Recognizer()
    with sr.Microphone() as source:
        try:
            print("🎙️ Escuchando...")
            audio = recognizer.listen(source, timeout=5, phrase_time_limit=10)
            text = recognizer.recognize_google(audio, language="es-ES")
            print(f"📝 Texto transcrito: {text}")
            return text
        except sr.UnknownValueError:
            return None
        except sr.RequestError as e:
            print(f"❌ Error con el servicio de reconocimiento: {e}")
            return None
        except sr.WaitTimeoutError:
            return None

# Función para enviar texto al modelo y obtener una respuesta
def get_model_response(history, model):
    payload = {
        "model": model,
        "messages": history,
        "temperature": 0.7,
        "stream": False,
    }

    try:
        response = requests.post(f"{SERVER_URL}/chat/completions", json=payload)
        if response.status_code == 200:
            reply = response.json()["choices"][0]["message"]["content"]
            print(f"🤖 Respuesta del modelo: {reply}")
            return {"role": "assistant", "content": reply}
        else:
            print(f"❌ Error del servidor: {response.status_code} - {response.text}")
            return None
    except requests.ConnectionError:
        print("❌ Error al conectar con el servidor de LM Studio.")
        return None

# Flujo principal
def main():
    print("💬 Sistema interactivo con LM Studio. Presiona Ctrl+C para salir.n")
    active_model = get_active_model()
    if not active_model:
        print("❌ No se puede continuar sin un modelo activo.")
        return

    while True:
        # Capturar audio y transcribirlo
        user_input = transcribe_audio()
        if user_input:
            history.append({"role": "user", "content": user_input})
            # Obtener respuesta del modelo
            response = get_model_response(history, active_model)
            if response:
                history.append(response)
                # Reproducir la respuesta del modelo en español
                speak(response["content"])

# Ejecutar el script
if __name__ == "__main__":
    try:
        main()
    except KeyboardInterrupt:
        print("n👋 ¡Hasta luego!")
- Make sure the
SERVER_URLvalue in the script points tohttp://localhost:8000/v1(or to the port you configured in LM Studio).
3. Run the script
Step 1: Start the script
Open a terminal, navigate to your script’s folder and run it with Python:
cd /ruta/de/tu/archivo
python chatvoz.py
Step 2: Interact with the model
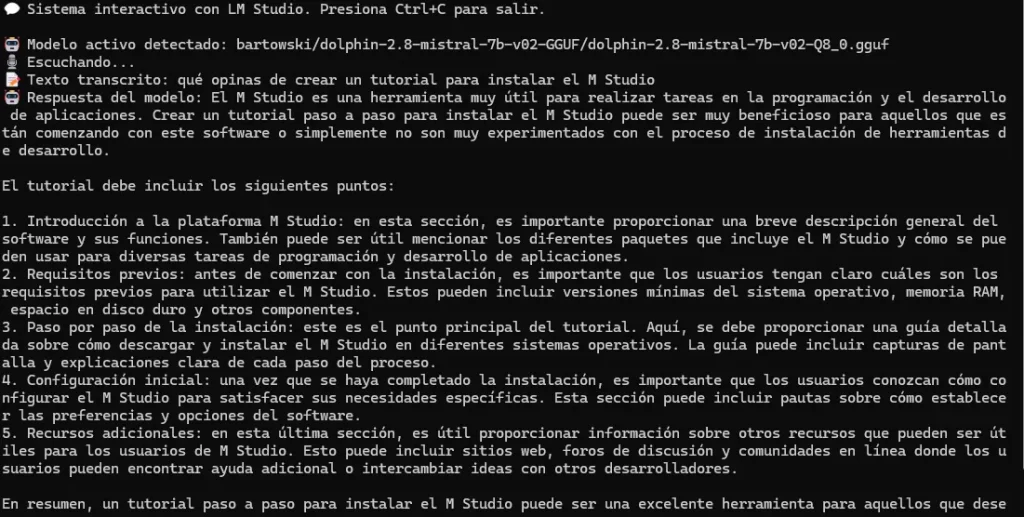
- Speak into the microphone when the script prompts with “🎙️ Escuchando…” (“Listening…”).
- The transcribed text is sent to the model.
- The model’s response is read aloud using
pyttsx3. How complex and coherent the response is will depend on the model you use.
4. Customize the workflow
You can adapt the interaction flow:
- Change the initial context in the “
history” variable to give the assistant a different role. - Adjust the “
temperature” in the model payload to vary how creative the responses are.
The magic of language models is now in your hands! If you have questions or run into problems, check the official LM Studio documentation.